DRV8302 - DRV8302 - 高性能BLDC驱动器
使用Arduino UNO
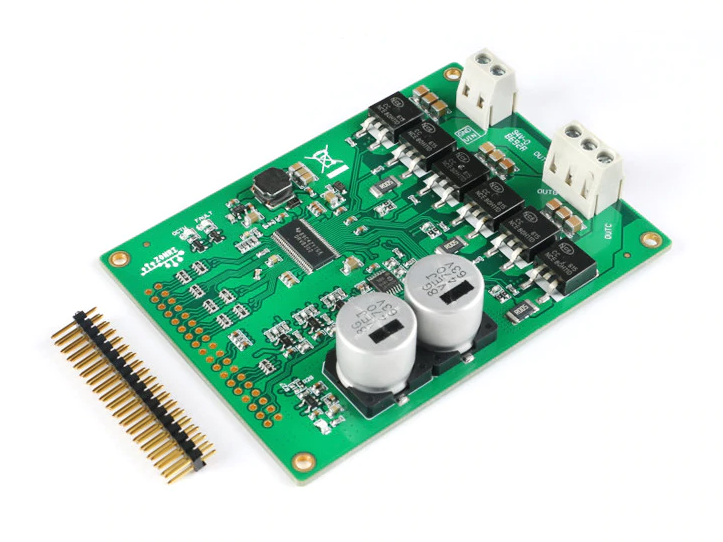
DRV8302是一款高性能BLDC驱动板,能够持续提供15A电流,峰值电流可达27A。它具备温度和过流保护功能,支持反电动势和三相电流检测,最重要的是,它仅需3PWM信号即可运行,这使其与简易FOC库兼容。
注意📢
截至目前(1.4.1版本 ),该库尚未实现电流控制环。电机扭矩直接通过电压控制。 更多信息。
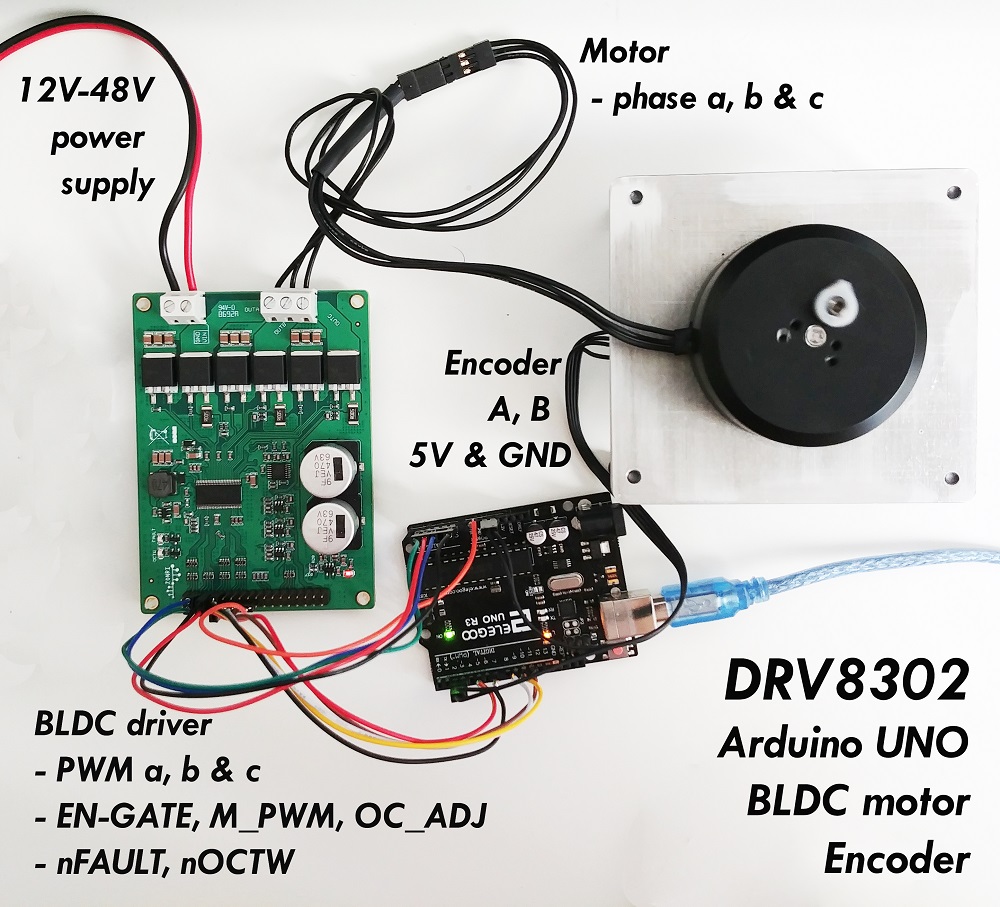
以下是此项目可能需要的硬件示例:
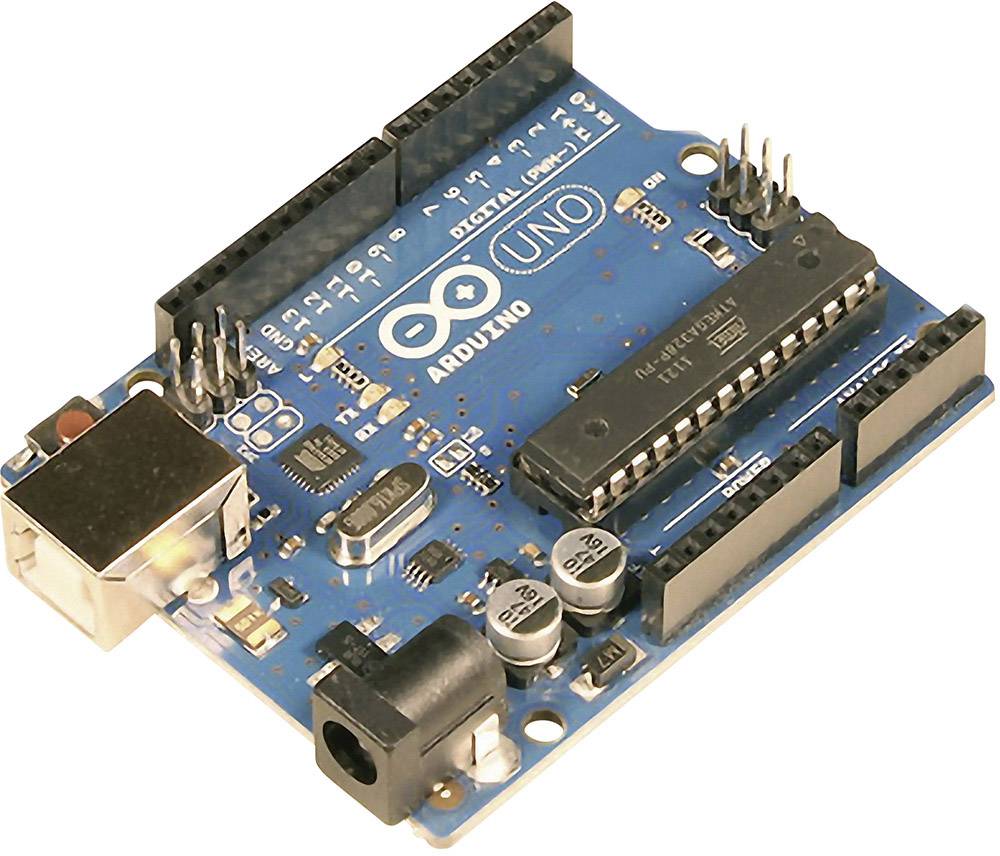
以下是使用Arduino UNO的连接方案示例:
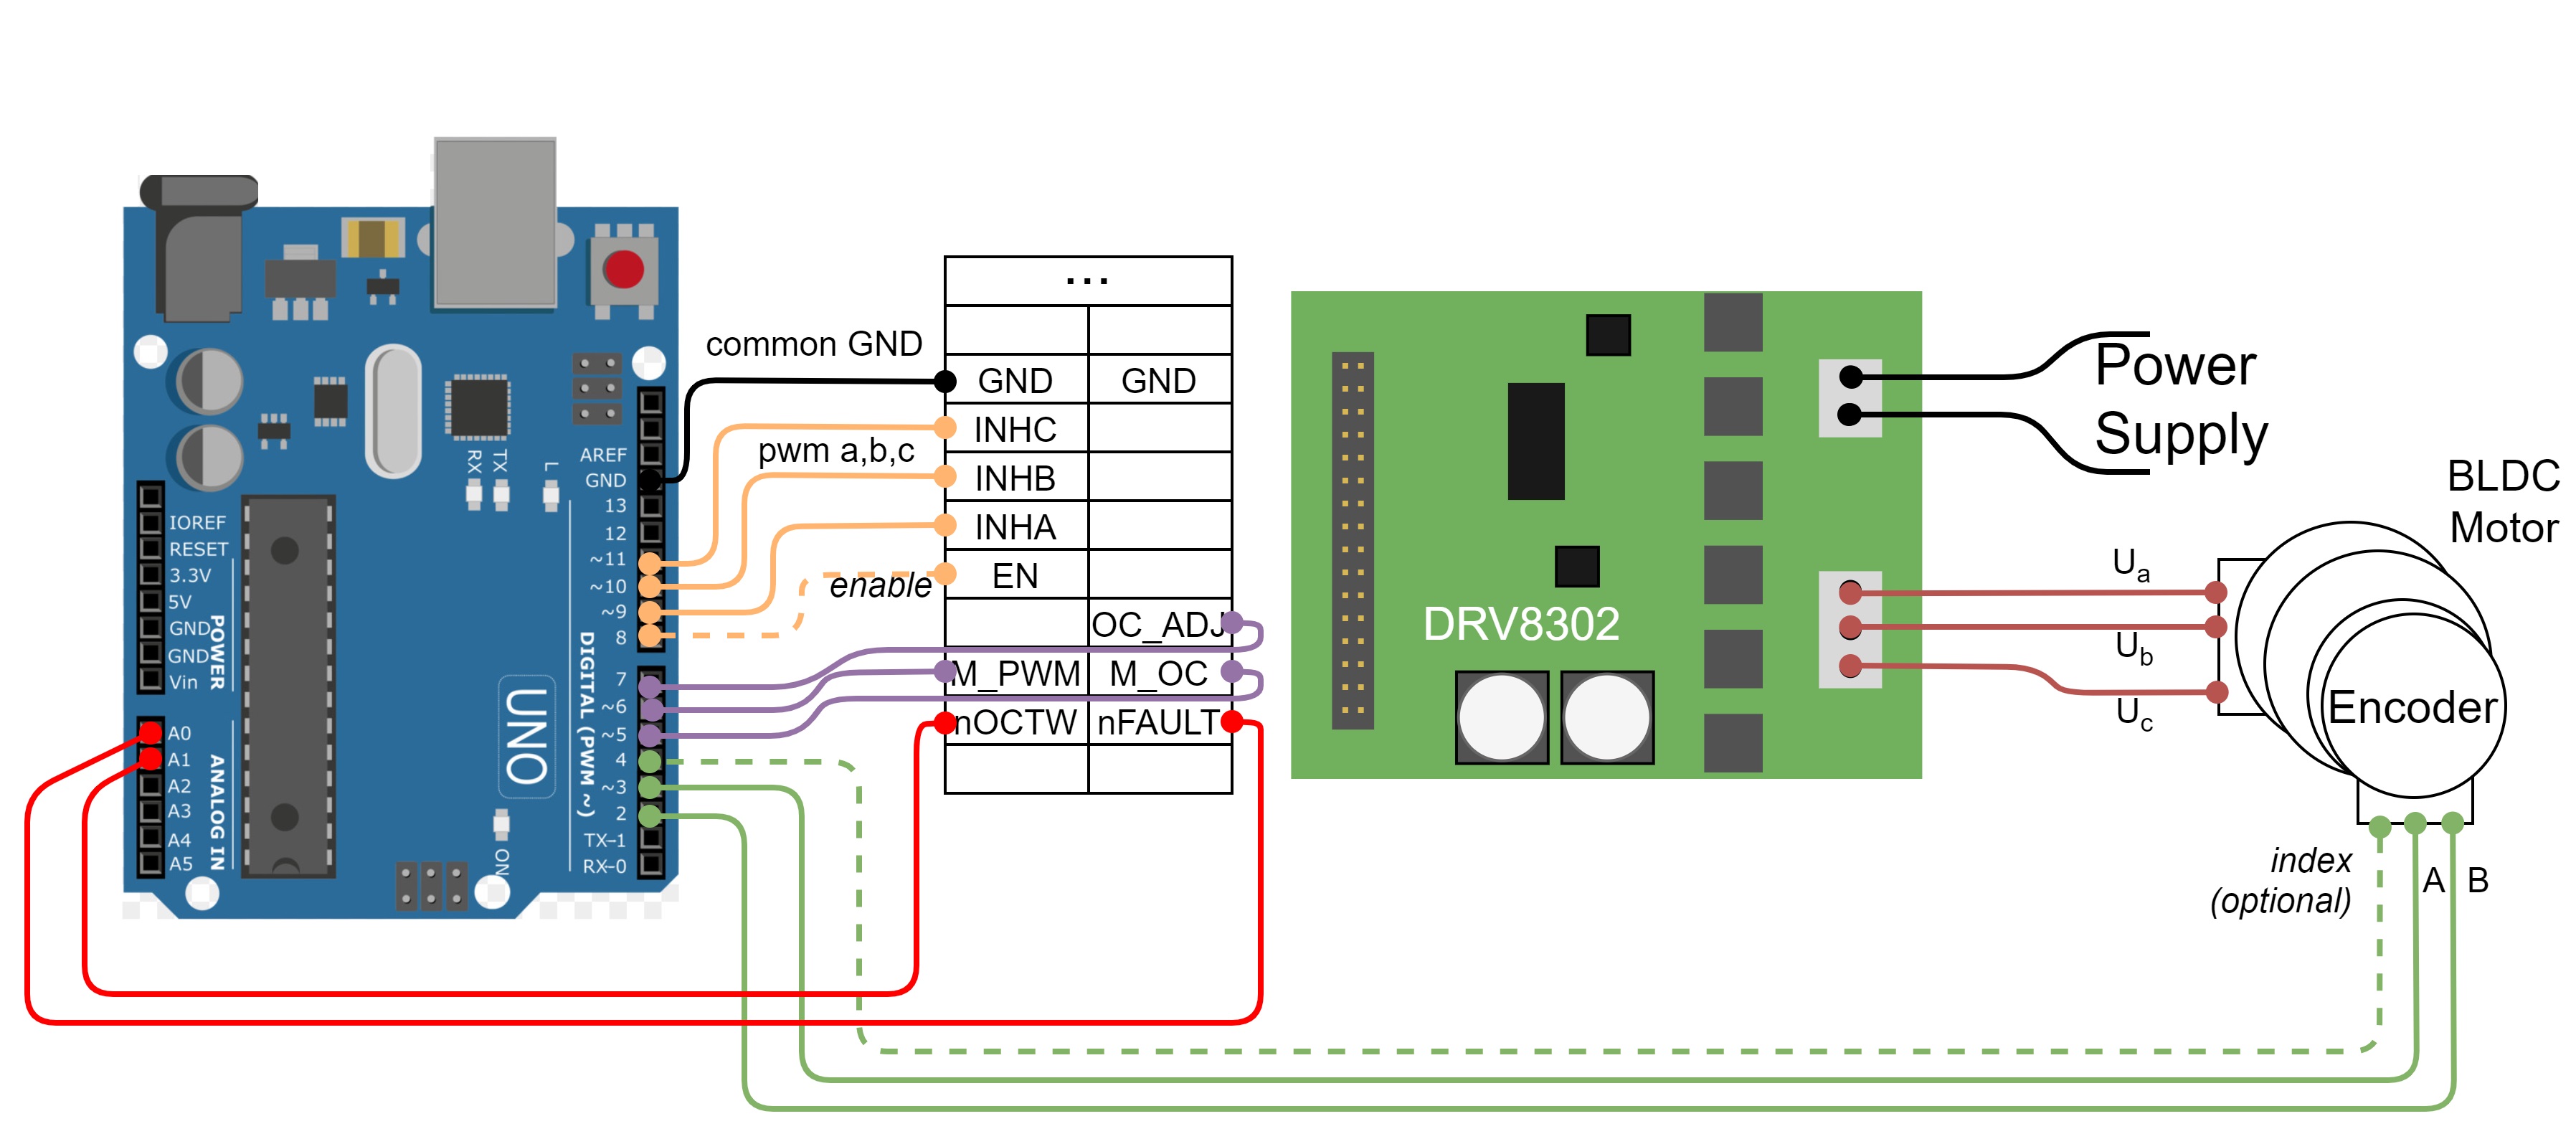
DRV8302
- 与本库支持的其他BLDC驱动器一样,该板接收3PWM信号:pwm
a、b和c。将它们连接到INHA、INHB和INHC - 此外,还需将使能引脚连接到
EN-GATE引脚 - 要配置BLDC驱动器,我们需要三个引脚(紫色)
M_PWM为高电平时启用3PWM模式(为低电平时,板载期望6PWM信号)M_OC为低电平时启用过流保护OC_ADJ模拟输入,用于调节过流限制 - 若不关心,可接高电平
- 要读取故障信号,我们需要读取两个引脚(红色)
nFAULT为高电平时,板载处于故障状态nOCTW为高电平时,达到过流限制
编码器
- 通道
A和B连接到外部中断引脚2和3 - 若编码器有
index信号,可连接到任何可用的数字引脚,此处我们将其连接到引脚4
电机
- 电机相
a、b和c直接连接到板载端子OUTA、OUTB和OUTC
示例连接
Arduino代码3PWM
使用3PWM运行DRV8302板的代码与其他低功率BLDC驱动器的代码几乎完全相同。唯一的区别是DRV8302的配置过程。
因此,让我们首先开始定义我们在板上使用的引脚:
// DRV8302 pins connections
// don't forget to connect the common ground pin
#define INH_A 9
#define INH_B 10
#define INH_C 11
#define EN_GATE 8
#define M_PWM 6
#define M_OC 5
#define OC_ADJ 7
变量INH_A、INH_B、INH_C和EN_GATE直接提供给BLDCDriver3PWM类构造函数。
// driver instance
BLDCDriver3PWM driver = BLDCDriver3PWM(INH_A, INH_B, INH_C, EN_GATE);
代码中另一个特定于DRV8302的部分是,需要在setup()函数的开头添加相关配置。
// DRV8302 specific code
// M_OC  - enable over-current protection
pinMode(M_OC,OUTPUT);
digitalWrite(M_OC,LOW);
// M_PWM  - enable 3pwm mode
pinMode(M_PWM,OUTPUT);
digitalWrite(M_PWM,HIGH);
// OD_ADJ - set the maximum over-current limit possible
// Better option would be to use voltage divisor to set exact value
pinMode(OC_ADJ,OUTPUT);
digitalWrite(OC_ADJ,HIGH);
其余部分是运行BLDC电机的常规简易FOC库代码。
以下是该项目的完整代码:
#include <SimpleFOC.h>

// DRV8302 pins connections
// don't forget to connect the common ground pin
#define INH_A 9
#define INH_B 10
#define INH_C 11
#define EN_GATE 8
#define M_PWM 6
#define M_OC 5
#define OC_ADJ 7

// motor instance
BLDCMotor motor = BLDCMotor(11);

// driver instance
BLDCDriver3PWM driver = BLDCDriver3PWM(INH_A, INH_B, INH_C, EN_GATE);

// encoder instance
Encoder encoder = Encoder(2, 3, 8192);
// channel A and B callbacks
void doA(){encoder.handleA();}
void doB(){encoder.handleB();}

// commander interface
Commander command = Commander(Serial);
void onMotor(char* cmd){ command.motor(&motor, cmd); }

void setup() {

  // initialize encoder sensor hardware
  encoder.init();
  encoder.enableInterrupts(doA, doB);
  // link the motor to the sensor
  motor.linkSensor(&encoder);

  // DRV8302 specific code
  // M_OC  - enable over-current protection
  pinMode(M_OC,OUTPUT);
  digitalWrite(M_OC,LOW);
  // M_PWM  - enable 3pwm mode
  pinMode(M_PWM,OUTPUT);
  digitalWrite(M_PWM,HIGH);
  // OD_ADJ - set the maximum over-current limit possible
  // Better option would be to use voltage divisor to set exact value
  pinMode(OC_ADJ,OUTPUT);
  digitalWrite(OC_ADJ,HIGH);

  // configure driver
  driver.voltage_power_supply = 12;
  driver.init();
  motor.linkDriver(&driver);

  // choose FOC modulation
  motor.foc_modulation = FOCModulationType::SpaceVectorPWM;

  // set control loop type to be used
  motor.controller = MotionControlType::torque;

  // controller configuration based on the control type
  motor.PID_velocity.P = 0.2;
  motor.PID_velocity.I = 20;

  // velocity low pass filtering time constant
  motor.LPF_velocity.Tf = 0.01;

  // angle loop controller
  motor.P_angle.P = 20;

  // angle loop velocity limit
  motor.velocity_limit = 50;
  // default voltage_power_supply
  motor.voltage_limit = 12;

  // use monitoring with serial for motor init
  // monitoring port
  Serial.begin(115200);
  // comment out if not needed
  motor.useMonitoring(Serial);

  // initialize motor
  motor.init();
  // align encoder and start FOC
  motor.initFOC();

  // set the initial target value
  motor.target = 2;

  // define the motor id
  command.add('M', onMotor, "motor");

  _delay(1000);
}


void loop() {
  // iterative setting FOC phase voltage
  motor.loopFOC();

  // iterative function setting the outer loop target
  // velocity, position or voltage
  // if target not set in parameter uses motor.target variable
  motor.move();

  // user communication
  command.run();
}
Arduino代码6PWM
使用6PWM运行DRV8302板的代码,我们需要根据所使用的微控制器正确配置引脚。
Arduino uno引脚分配示例如下。
// DRV8302 pins connections
// don't forget to connect the common ground pin
#define INH_A 5
#define INH_B 9
#define INH_C 11
#define INL_A 6
#define INL_B 10
#define INL_C 3
#define EN_GATE 8
#define M_PWM 6
#define M_OC 5
#define OC_ADJ 7
对于stm32 Nucleo板,上述引脚分配不适用,但有相应适用的引脚分配。
// DRV8302 pins connections
// don't forget to connect the common ground pin
#define INH_A 7
#define INH_B 6
#define INH_C 5
#define INL_A 2
#define INL_B 3
#define INL_C 4
#define EN_GATE 8
#define M_PWM 9
#define M_OC 10
#define OC_ADJ 11
变量INH_A、INH_B、INH_C、INL_A、INL_B、INHL_C和EN_GATE直接提供给BLDCDriver6PWM类构造函数。
// driver instance
BLDCDriver6PWM driver = BLDCDriver6PWM(INH_A, INL_A, INH_B,INL_B, INH_C, INL_C, EN_GATE);
代码中另一个特定于DRV8302的部分是,需要在setup()函数的开头添加相关配置。
// DRV8302 specific code
// M_OC  - enable over-current protection
pinMode(M_OC,OUTPUT);
digitalWrite(M_OC,LOW);
// M_PWM  - enable 6pwm mode (can be left open)
pinMode(M_PWM,OUTPUT);
digitalWrite(M_PWM,LOW);
// OD_ADJ - set the maximum over-current limit possible
// Better option would be to use voltage divisor to set exact value
pinMode(OC_ADJ,OUTPUT);
digitalWrite(OC_ADJ,HIGH);
其余部分是运行BLDC电机的常规简易FOC库代码。
以下是该项目的完整代码:
#include <SimpleFOC.h>

// DRV8302 pins connections
// don't forget to connect the common ground pin
#define INH_A 5
#define INH_B 9
#define INH_C 11
#define INL_A 6
#define INL_B 10
#define INL_C 3
#define EN_GATE 8
#define M_PWM 6
#define M_OC 5
#define OC_ADJ 7

// motor instance
BLDCMotor motor = BLDCMotor(11);

// driver instance
BLDCDriver6PWM driver = BLDCDriver6PWM(INH_A, INL_A, INH_B,INL_B, INH_C, INL_C, EN_GATE);

// encoder instance
Encoder encoder = Encoder(2, 3, 8192);
// channel A and B callbacks
void doA(){encoder.handleA();}
void doB(){encoder.handleB();}

// commander interface
Commander command = Commander(Serial);
void onMotor(char* cmd){ command.motor(&motor, cmd); }

void setup() {

  // initialize encoder sensor hardware
  encoder.init();
  encoder.enableInterrupts(doA, doB);
  // link the motor to the sensor
  motor.linkSensor(&encoder);

  // DRV8302 specific code
  // M_OC  - enable over-current protection
  pinMode(M_OC,OUTPUT);
  digitalWrite(M_OC,LOW);
  // M_PWM  - enable 6pwm mode (can be left open)
  pinMode(M_PWM,OUTPUT);
  digitalWrite(M_PWM,LOW);
  // OD_ADJ - set the maximum over-current limit possible
  // Better option would be to use voltage divisor to set exact value
  pinMode(OC_ADJ,OUTPUT);
  digitalWrite(OC_ADJ,HIGH);

  // configure driver
  driver.voltage_power_supply = 12;
  driver.init();
  motor.linkDriver(&driver);

  // choose FOC modulation
  motor.foc_modulation = FOCModulationType::SpaceVectorPWM;

  // set control loop type to be used
  motor.controller = MotionControlType::torque;

  // controller configuration based on the control type
  motor.PID_velocity.P = 0.2;
  motor.PID_velocity.I = 20;

  // velocity low pass filtering time constant
  motor.LPF_velocity.Tf = 0.01;

  // angle loop controller
  motor.P_angle.P = 20;

  // angle loop velocity limit
  motor.velocity_limit = 50;
  // default voltage_power_supply
  motor.voltage_limit = 12;

  // use monitoring with serial for motor init
  // monitoring port
  Serial.begin(115200);
  // comment out if not needed
  motor.useMonitoring(Serial);

  // initialize motor
  motor.init();
  // align encoder and start FOC
  motor.initFOC();

  // set the initial target value
  motor.target = 2;

  // define the motor id
  command.add('M', onMotor, "motor");

  _delay(1000);
}


void loop() {
  // iterative setting FOC phase voltage
  motor.loopFOC();

  // iterative function setting the outer loop target
  // velocity, position or voltage
  // if target not set in parameter uses motor.target variable
  motor.move();

  // user communication
  command.run();
}