PWM输出磁性传感器设置
步骤1. 实例化MagneticSensorPWM类
为了将PWM输出磁性位置传感器与SimpleFOC库一起使用,首先创建MagneticSensorPWM类的实例:
// MagneticSensorPWM(uint8_t _pinPWM, int _min_raw_count, int _max_raw_count)
// - _pinPWM: the pin that is reading the pwm from magnetic sensor
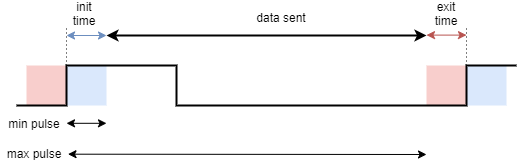
// - _min_raw_count: the minimal length of the pulse (in microseconds)
// - _max_raw_count: the maximal length of the pulse (in microseconds)
MagneticSensorPWM sensor = MagneticSensorPWM(2, 4, 904);
该类的参数有
pinPWM- 读取磁性传感器PWM信号的引脚min_raw_count- 最小预期脉冲时间(以微秒为单位)。这通常是脉冲初始时间的长度max_raw_count- 最大脉冲时间(以微秒为单位)。这是初始脉冲时间加上数据发送时间的值
💡 找出最小值和最大值
每个微控制器都有所不同,每个传感器也是如此,因此我们建议您使用`examples/sensor_test/magentic_sensor_pwm_example/find_raw_min_max`中提供的示例来找出您的传感器的最大值和最小值。
📚 有关PWM传感器如何编码角度的更深入解释,请参见AS5048数据手册或AS5600数据手册的第27页。AS5048 ,AS5600
步骤2. 选择操作模式
本库中实现了两种使用PWM传感器的方式:
- 阻塞方式 - 基于
pulseln函数 - 基于中断的非阻塞方式
阻塞实现
创建传感器类后,您只需调用init()函数。此函数初始化传感器硬件。因此,您最终的磁性传感器代码将如下所示:
MagneticSensorPWM sensor = MagneticSensorPWM(2, 4, 904);

void setup(){
  ...
  sensor.init();
  ...
}
如果您希望使用多个磁性传感器,请确保将它们的chip_select引脚连接到不同的Arduino引脚,并遵循与上述相同的思路,以下是一个简单示例:
MagneticSensorPWM sensor1 = MagneticSensorPWM(2, 4, 904);
MagneticSensorPWM sensor2 = MagneticSensorPWM(3, 4, 904);

void setup(){
  ...
  sensor1.init();
  sensor2.init();
  ...
}
请查看magnetic_sensor_analog_pwm.ino示例以了解更多相关信息。
注意:阻塞支持的局限性 ⚠️
可以说,磁性传感器的阻塞支持在本库支持的所有位置传感技术中性能最差。每次代码从传感器读取角度时,它都会读取一个脉冲,由于磁性传感器的PWM频率约为1kHz,这意味着读取角度的最短执行时间约为1ms。 但对于Arduino UNO和类似的微控制器,这可能是唯一的选择。
基于中断的实现
为了以非阻塞方式异步读取磁性传感器,本库提出了基于中断的方法。要启用此方法,首先需要创建一个简单的缓冲处理函数:
// create the class
MagneticSensorPWM sensor = MagneticSensorPWM(3, 4, 904);
// create teh buffering function
void doPWM(){sensor.handlePWM();}
然后,在setup函数中,用户需要调用init()函数,之后调用带有缓冲函数作为参数的attachInterrupt函数。以下是示例代码:
// create the class
MagneticSensorPWM sensor = MagneticSensorPWM(3, 4, 904);
// create teh buffering function
void doPWM(){sensor.handlePWM();}

void setup(){
  ...
  // init the sensor
  sensor.init();
  // enable the interrupt and start reading the sensor
  sensor.enableInterrupt(doPWM);
  ...
}
以下是两个传感器的示例代码:
MagneticSensorPWM sensor1 = MagneticSensorPWM(2, 4, 904);
void doPWM1(){sensor1.handlePWM();}
MagneticSensorPWM sensor2 = MagneticSensorPWM(3, 4, 904);
void doPWM2(){sensor2.handlePWM();}

void setup(){
  ...
  sensor1.init();
  sensor1.enableInterrupt(doPWM1);
  sensor2.init();
  sensor2.enableInterrupt(doPWM2);
  ...
}
如果硬件中断引脚不足,请务必查看示例magnetic_sensor_pwm和magnetic_sensor_pwm_software_interrupt,了解使用软件中断的示例。
步骤3. 实时使用磁性传感器
本库中实现的磁性传感器有两种使用方式:
- 作为FOC算法的电机位置传感器
- 作为独立的位置传感器
FOC算法的位置传感器
要将传感器与本库中实现的FOC算法一起使用,一旦初始化了sensor.init()(并可能启动了中断),您只需通过执行以下操作将其链接到电机:
motor.linkSensor(&sensor);
您将能够使用电机实例访问电机的角度和速度:
motor.shaft_angle; // motor angle
motor.shaft_velocity; // motor velocity
或者通过传感器实例:
sensor.getAngle(); // motor angle
sensor.getVelocity(); // motor velocity
示例代码
以下是带有基于中断的传感器实现的PWM磁性传感器与BLDC电机和驱动器的快速示例代码:
#include <SimpleFOC.h>

// motor and driver
BLDCMotor motor = BLDCMotor(7);
BLDCDriver3PWM driver = BLDCDriver3PWM(9, 5, 6, 8);

// MagneticSensorPWM(uint8_t _pinPWM, int _min, int _max)
// - _pinPWM:         the pin that is reading the pwm from magnetic sensor
// - _min_raw_count:  the minimal length of the pulse (in microseconds)
// - _max_raw_count:  the maximal length of the pulse (in microseconds)
MagneticSensorPWM sensor = MagneticSensorPWM(2, 4, 904);
void doPWM(){sensor.handlePWM();}

void setup() {
  // driver
  driver.init()
  motor.linkDriver(&driver);

  // init magnetic sensor hardware
  sensor.init();
  //enable interrupts
  sensor.enableInterrupt(doPWM);
  motor.linkSensor(&sensor);

  // init motor hardware
  motor.init();
  motor.initFOC();

  Serial.println("Motor ready");
  _delay(1000);
}
void loop(){
  motor.loopFOC();
  motor.move();
}
独立传感器
要在任何给定时间获取磁性传感器的角度和速度,您可以使用以下公共方法:
class MagneticSensorPWM{
 public:
    // shaft velocity getter
    float getVelocity();
  	// shaft angle getter
    float getAngle();
}
多次调用
getVelocity调用
getVelocity时,只有当前一次调用以来的经过时间长于变量min_elapsed_time(默认100us)中指定的时间时,它才会计算速度。如果自上次调用以来的经过时间短于min_elapsed_time,则该函数将返回先前计算的值。如有必要,可以轻松更改变量min_elapsed_time:sensor.min_elapsed_time = 0.0001; // 100us by default
示例代码
以下是使用其PWM输出的AS5048A磁性传感器的快速示例:
#include <SimpleFOC.h>

// MagneticSensorPWM(uint8_t _pinPWM, int _min, int _max)
// - _pinPWM:         the pin that is reading the pwm from magnetic sensor
// - _min_raw_count:  the minimal length of the pulse (in microseconds)
// - _max_raw_count:  the maximal length of the pulse (in microseconds)
MagneticSensorPWM sensor = MagneticSensorPWM(2, 4, 904);
void doPWM(){sensor.handlePWM();}

void setup() {
  // monitoring port
  Serial.begin(115200);

  // initialise magnetic sensor hardware
  sensor.init();
  // comment out to use sensor in blocking (non-interrupt) way
  sensor.enableInterrupt(doPWM);

  Serial.println("Sensor ready");
  _delay(1000);
}

void loop() {
  // IMPORTANT - call as frequently as possible
  // update the sensor values
  sensor.update();
  // display the angle and the angular velocity to the terminal
  Serial.print(sensor.getAngle());
  Serial.print("\t");
  Serial.println(sensor.getVelocity());
}