无传感器FOC示例
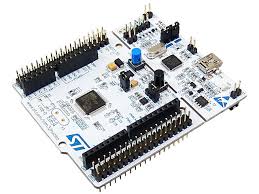
使用简易FOCShield和Stm32 Nucleo-64
在这个无传感器FOC控制示例中,我们将使用以下硬件:

这只是一个如何使用简易FOC库在没有任何传感器的情况下控制电机的示例。你可以使用任何其他电机(BLDC、步进电机或混合步进电机)以及任何其他驱动器或微控制器。只要驱动器有足够的电流容量来驱动电机,并且微控制器有足够的处理能力来运行FOC算法,你就可以使用它。唯一真正的限制是你需要能够测量电机的相电流。这是因为无传感器观测器使用相电流来估计转子位置和速度。
连接所有部件
有关Nucleo板和简易FOCShield连接的更深入解释,请查看连接示例。

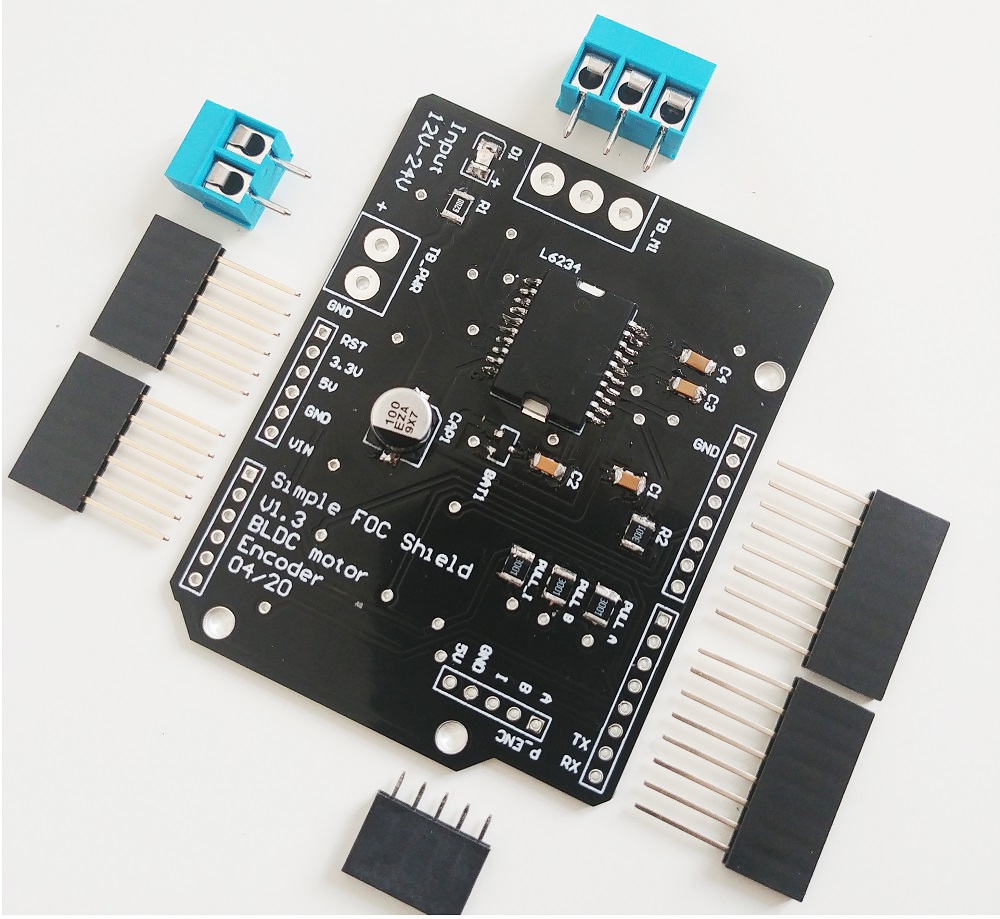
有关简易FOCShield的更多信息,请查看文档。
电机
- 电机相
a、b和c直接连接到电机端子连接器TB_M1
SimpleFOCShield连接

| 信号 | Pwm A | Pwm B | Pwm C | 使能 |
|---|---|---|---|---|
| 引脚 | 6 | 10 | 5 | 8 |
Arduino代码
首先,你需要包含SimpleFOC库:
#include <SimpleFOC.h>
确保你已经安装了该库。如果你还没有安装,请查看入门页面
然后导入驱动器库和无传感器观测器:
#include <SimpleFOCDrivers.h>
#include "encoders/MXLEMMING_observer/MXLEMMINGObserverSensor.h"
电机和驱动器
接下来,我们需要定义BLDC电机和驱动器类。电机类用于控制电机,驱动器类用于控制电力电子设备。
// define BLDC motor
// - 11 is the number of pole pairs
// - 5.9 is the resistance of the motor [Ohms]
// - 100 is the KV rating of the motor in [RPM per Volt]
// - 0.0005 is the phase inductance [H]
// These parameters are specific to the motor you are using, please check the motor datasheet
// I'm using GBM3506-120T
BLDCMotor motor = BLDCMotor(11, 5.94, 100, 0.0005);

// define BLDC driver
BLDCDriver3PWM driver = BLDCDriver3PWM(6, 10, 5, 8);
注意:正确的电机参数至关重要!
拥有正确的电机参数对于电机正常工作至关重要。
KV额定值
电机的KV额定值通常很容易在数据手册中找到。如果数据手册没有指定KV额定值,它们通常会指定一些额定电压和速度。在这种情况下,你可以通过将电机的RPM除以施加到它的电压来计算KV。你也可以使用
examples/utils/calibration/find_kv_rating.ino示例来找出它。
相电阻和电感
如果你不确定你的电机电阻和电感是多少,你可以使用此代码来测量它们:
#include <SimpleFOC.h> // Stepper motor & BLDC driver instance BLDCMotor motor = BLDCMotor(11); // SimpleFOCShield BLDCDriver3PWM driver = BLDCDriver3PWM(6, 10, 5, 8); // inline current sensor instance // ACS712-05B has the resolution of 0.185mV per Amp LowsideCurrentSense current_sense = LowsideCurrentSense(185.0f, A0, A2); void setup() { // use monitoring with serial Serial.begin(115200); // enable more verbose output for debugging // comment out if not needed SimpleFOCDebug::enable(&Serial); // driver config // power supply voltage [V] driver.voltage_power_supply = 20; driver.init(); // link driver motor.linkDriver(&driver); // link current sense and the driver current_sense.linkDriver(&driver); // current sense init and linking current_sense.init(); motor.linkCurrentSense(¤t_sense); // initialise motor motor.init(); // find the motor parameters motor.characteriseMotor(3.5f); _delay(1000); } void loop() { // do nothing _delay(1000); }代码输出将如下所示:
MOT: Init
MOT: Enable driver.
MOT: Measuring phase to phase resistance, keep motor still...
MOT: Estimated phase to phase resistance: 5.94
MOT: Measuring inductance, keep motor still...
MOT: Inductance measurement complete!
MOT: Measured D-inductance in mH: 0.50
MOT: Measured Q-inductance in mH: 0.59
然后你可以使用测量值来定义电机:
// define BLDC motor
// - 11 is the number of pole pairs
// - 5.94 is the resistance of the motor [Ohms]
// - 100 is the KV rating of the motor in [RPM per Volt]
// - 0.0005 is the phase inductance [H]
BLDCMotor motor = BLDCMotor(11, 5.94, 100, 0.0005);
无传感器观测器
接下来,我们需要定义无传感器观测器类。观测器用于在不使用任何传感器的情况下估计转子位置和速度。该观测器基于MXLEMMING_observer
// define sensorless observer
MXLEMMINGObserverSensor observer = MXLEMMINGObserverSensor(motor);
剩下的代码大致上和通常的一样。
完整的Arduino代码
无传感器 FOC 示例的完整代码如下:
#include <SimpleFOC.h>
#include <SimpleFOCDrivers.h>
#include "encoders/MXLEMMING_observer/MXLEMMINGObserverSensor.h"
// Stepper motor & BLDC driver instance
BLDCMotor motor = BLDCMotor(11, 5.94, 100, 0.0005);
// SimpleFOCShield
BLDCDriver3PWM driver = BLDCDriver3PWM(6, 10, 5, 8);
// MXLEMMING observer sensor instance
MXLEMMINGObserverSensor observer = MXLEMMINGObserverSensor(motor);
// inline current sensor instance
// ACS712-05B has the resolution of 0.185mV per Amp
LowsideCurrentSense current_sense = LowsideCurrentSense(185.0f, A0, A2);
// commander communication instance
Commander command = Commander(Serial);
void doMotor(char* cmd){ command.motor(&motor, cmd); }
void setup() {
// use monitoring with serial
Serial.begin(115200);
// enable more verbose output for debugging
// comment out if not needed
SimpleFOCDebug::enable(&Serial);
// link the motor to the sensor
motor.linkSensor(&observer);
// driver config
// power supply voltage [V]
driver.voltage_power_supply = 20;
driver.init();
// link driver
motor.linkDriver(&driver);
// link current sense and the driver
current_sense.linkDriver(&driver);
// set control loop type to be used
motor.controller = MotionControlType::torque;
motor.torque_controller = TorqueControlType::foc_current;
// current sense init and linking
current_sense.init();
motor.linkCurrentSense(¤t_sense);
// initialise motor
motor.init();
// skip the sensor alignment
motor.sensor_direction= Direction::CW;
motor.zero_electric_angle = 0;
motor.initFOC();
// subscribe motor to the commander
command.add('M', doMotor, "motor");
// Run user commands to configure and the motor (find the full command list in docs.simplefoc.com)
Serial.println("Motor ready.");
_delay(1000);
}
void loop() {
// iterative setting FOC phase voltage
motor.loopFOC();
// iterative function setting the outter loop target
motor.move();
// motor monitoring
motor.monitor();
// user communication
command.run();
}
你可以使用命令器与电机交互。例如,你可以通过发送命令M0.5将目标扭矩设置为0.5安培。你也可以使用其他命令来控制电机,例如M0停止电机,M1将目标扭矩设置为1安培等。你可以在文档中找到完整的命令列表。