On this page
Fabrication guide for SimpleFOCShield v2.x
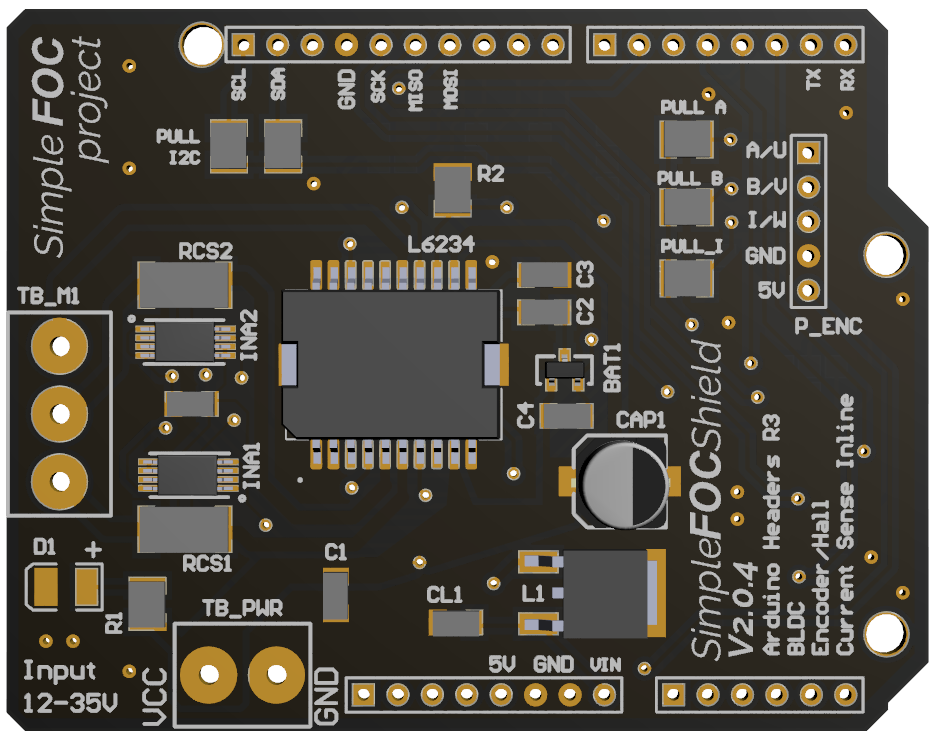
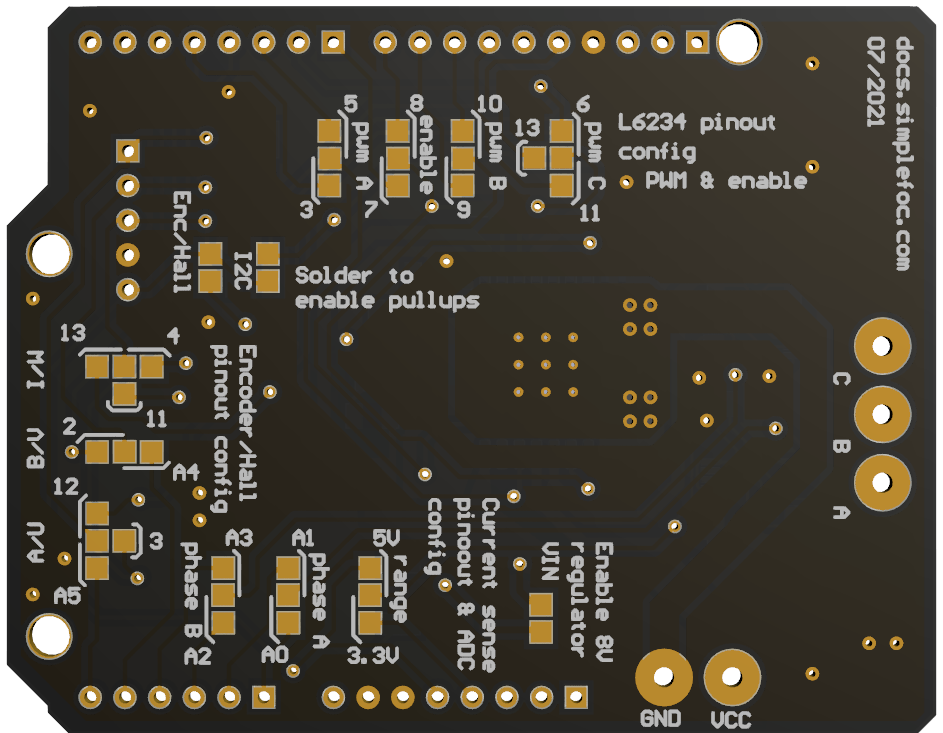
Here is a quick guide how to fabricate the Arduino SimpleFOCShield version V2.0.4
📢 Official Easy EDA project here
Board releases
To check the release timeline, click here
| Version | link | Release date | Comment |
|---|---|---|---|
| SimpleFOCShield v2.0 | release v2.0 | 01/21 | - 3A in-line current sensing - 5V regulator - new pinout for hardware config |
| SimpleFOCShield v2.0.1 | release v2.0.1 | 01/21 | - reduced via size - configurable range |
| SimpleFOCShield v2.0.2 | release v2.0.2 | 01/21 | replaced 7805(connected to 5V) with 7808 (connected to VIN) to be compatible with stm32 Nucleo-64 |
| SimpleFOCShield v2.0.3 | release v2.0.3 | 03/21 | - Shortened the lines from ADC to current sense - Typo fix : underside label switched phase A and phase B |
| SimpleFOCShield v2.0.4 | release v2.0.4 | 09/21 | - Pullup config simplified - Max input voltage 35V - removed CAP2 for a CL1 - Easy EDA version of the project |
Github repository contains:
- Schematics - PDF file
- Gerber - Gerber, NC Drill & Assembly files
- Bill Of Materials (BOM) - Excel sheet
- 3D model - 3D PDF & STEP file
- PCB design project - Altium Designer 2019
Fabrication procedure and cost
The price of the fabrication will highly depend of the number of boards and the companies you decide to use both as PCB manufacturers and the component suppliers. Here are two nice articles explaining how to approach the problem choosing the PCB manufacturer form electronics-notes.com and component supplier from electronics-notes.com. But in most of cases it will always boil down to the price :)
PCB fabrication + Self assembly
Even though most of the components are big smd components and the board is intentionally made to me solderable by hand the curent sense amplifiers are going to be a bit more difficult. But if you are interested in this way of producing this board here is a quick guide how to make it.
PCB fabrication
Download the gerber files and provide them to your PCB manufacturer of choice. So far I have used seeedstrudio and JLCPCB. The price of 10 PCBs is around 5$ but the shipping was around 20$.
| Quantity | SeedStudio | JLCPCB |
|---|---|---|
| 5 | 5€ | 2€ |
| 10 | 5€ | 2€ |
| 30 | 30€ | 15€ |
| 50 | 50€ | 30€ |
On top of these prices you will have to pay shipping of approximately 20€.
Component purchase
Here is a complete list of all the components you will need to make the board:
| Component | Description | Quantity | Manufacturer Number |
|---|---|---|---|
| L6234 circuit: Datasheet | |||
| C1 | 0.1 uF | 1 | C1206C104M5RECAUTO |
| C2 | 0.01 uF | 1 | C1206C103J3RAUTO |
| C3 | 1 uF | 1 | C1206X105K3RAC3316 |
| C4 | 0.22 uF | 1 | C1206C224J5RECAUTO7210 |
| CAP1 | 100 uF (Electrolytic) | 1 | EEEHAV101XAP |
| BAT1 | Schottky diodes | 1 | TBAT54S,LM |
| L6234 | Motor driver chip | 1 | L6234PD |
| Pull Up and Pull Down resistors | |||
| PULL_SCL, PULL_SDA, R2 | 4.7kΩ | 3 | 603-RC1210FR-074K7L |
| PULL_A, PULL_B, PULL_I | 3kΩ | 3 | RN73H2ETTD3001F50 |
| LED circuit | |||
| D1 | Red LED | 1 | 156120RS75300 |
| R1 | 620Ω | 1 | RN73H2ETTD6200F50 |
| Linear regulator circuit | |||
| L1 | L78M08 | 1 | L78M08CDT-TR |
| CL1 | 0.1 uF | 1 | C1206C104M5RECAUTO |
| Curent sense circuit | |||
| CBY1 | 0.1 uF | 1 | C1206C224J5RECAUTO7210 |
| INA1, INA2 | INA240A2 current sense amp | 2 | INA240A2 |
| RCS1, RCS2 | 0.01Ohm (or 0.006Ohm) 2512 | 2 | WSLT2512R0100FEA |
| Terminal connectors | |||
| TB_M1 | 3 pin, 5mm | 1 | TB002-500-03BE |
| TB_PWR | 2 pin, 5mm | 1 | TB002-500-02BE |
| Header connectors | |||
| P1, P4, P2, P3 | 8 pin, 10 pin, 6 pin female, long | 2 | sparkfun Arduino |
| P_ENC | 5 pin, male/female | 1 | 649-1012937990501BLF |
The same list ( a bit optimized for PCB manufacturers ) you can download on link Bill of Materials. In my case I have used Mouser as my component supplier but the components of this board should be easy to find with any other supplier. The price of the components was around 10$ per board and the shipping was again around 20$ (for orders under 50$).
Note
The components with the manufacturers numbers I have chosen are not really set in stone, feel free to optimize them both in terms of prices and values if necessary.
Board assembly and soldering
Once when you have all the components and the PCBs the fun begins. All the components are relatively easy to solder. All the capacitors are 1206, all the resistors are 1210, the connectors are all through-hole and there is no real small SMD components. Therefore with some patience and you should have no problems soldering this board with a regular soldering iron and a bit of time. Therefore take a coffee and one deep breath and you are ready for 20 minutes of fun. The only non-fun part are two current sense amplifier INA240, but even they are not soooooo small 😊 .
Note
The board itself already has the descriptor names of the components on it so it should be easy to determine which component goes where. There is also an assembly drawing in the Pick and Place folder of the gerber files if you prefer to have a printed version.
PCB fabrication and assembly service - preferred choice 📢
This option is a lot simpler and produces much better results. It is also even cheaper for larger quantities > 50pcs. To order the boards, download the Gerber files and Bill of Materials and supply it to your manufacturer of choice. In my case, I’m using the JLCPCB.
Fully assembled versions
Order your own fully tested and assembled Arduino SimpleFOCShield from our shop.