On this page
Velocity open-loop control
This control loop allows you to spin your BLDC motor with desired velocity without using position sensor. This mode is enabled by:
// set velocity control open-loop mode
motor.controller = MotionControlType::velocity_openloop;
You can find some examples in examples/motion_control/openloop_motor_control/ folder.
How it works?
Choose the motor type:
Choose the torque control type:
Voltage torque mode Current torque mode
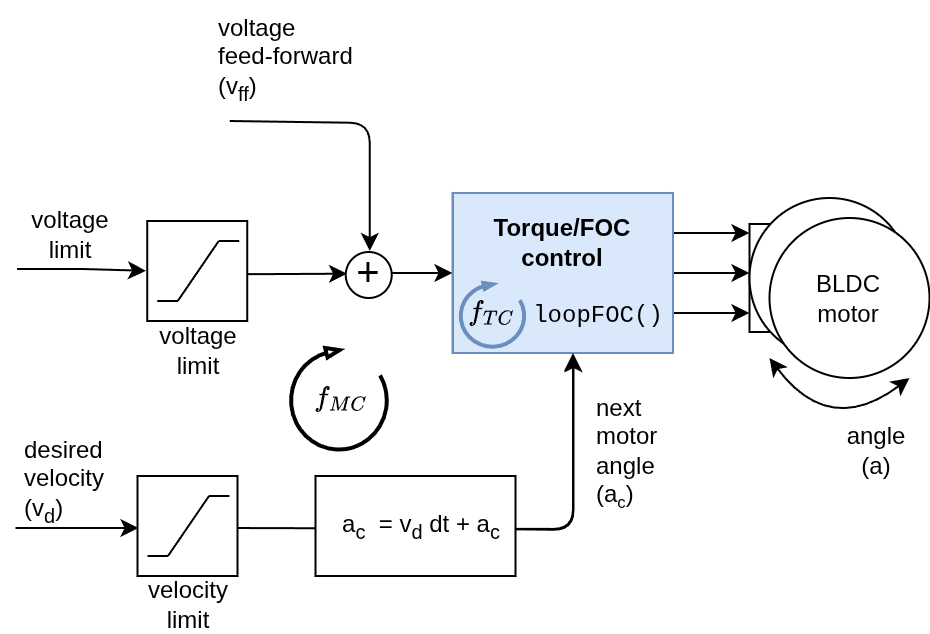
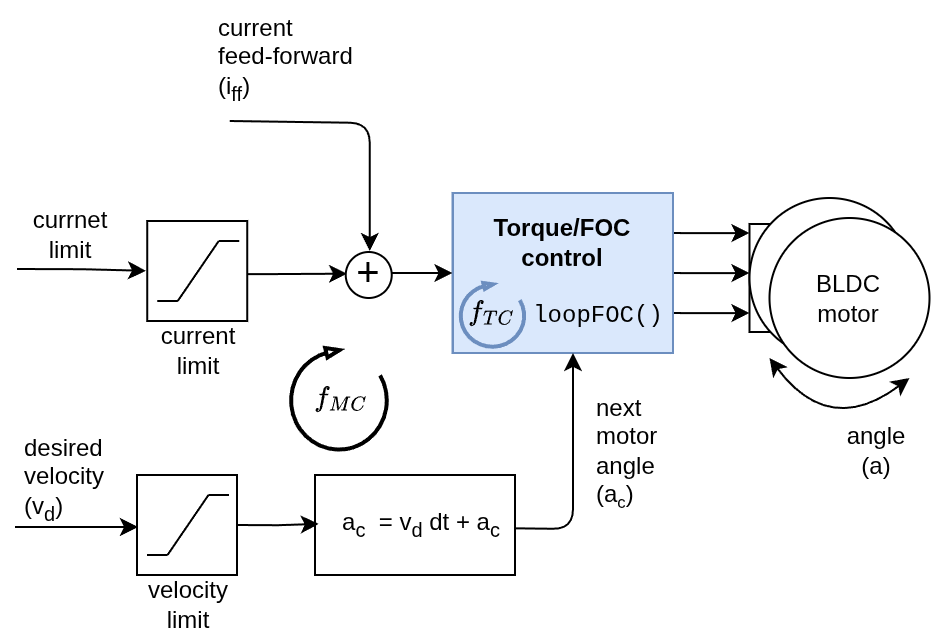
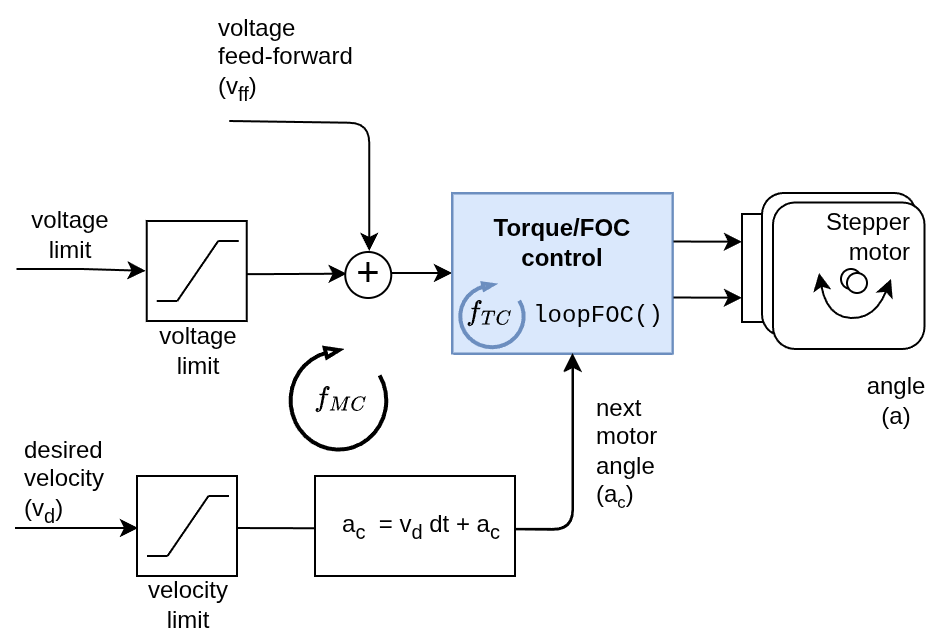
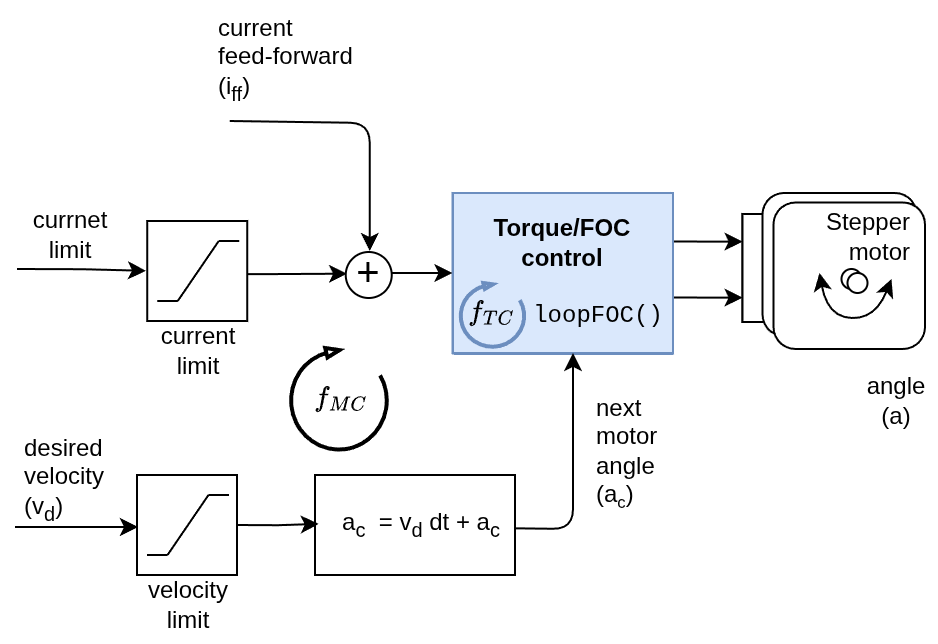
This control algorithm is very simple. User can set the target velocity it wants the motor to turn with \(v_d\). In each step of algorithm execution it is going to add a small angle step to the current angle \(a_c\) in order to achieve the target velocity. The angle step is going to be calculated by multiplying the target velocity with the sample time \(dt\) of the algorithm. Then the maximal allowed voltage motor.voltage_limit or current motor.current_limit is going to be applied to the motor using the underlying torque/FOC control loop (motor.loopFOC()).
This is the simplified version of the calculation of the next angle to set to the motor:
\[a_c = a_c + v_d dt;\]The sample time \(dt\) of the algorithm is adaptively calculated upon every algorithm execution (motor.move() call) and it is equal to the time passed since the last execution of the algorithm (time between two motor.move() calls). This means that the algorithm is going to be very stable even if the motor.move() calls are not happening at a constant frequency. You can check sampling time of the algorithm by checking motor.move_time.us (representing the time between two motor.move() calls in microseconds) variable.
Efficiency Warning
Open-loop control is highly inefficient because it lacks position feedback. To ensure the motor follows the target, the library applies the maximum allowed voltage or current at all times, regardless of the actual load or speed error.
Units
The angles in the formula are in radians, the velocities are in radians per second and the time is in seconds. Make sure to use the correct units when setting the target velocity and the limits.
Target and limits
Open loop velocity control has two inputs:
- target velocity
motor.target - the limits
motor.voltage_limitandmotor.current_limit(depending on the torque control mode).
Target velocity is the velocity you want your motor to turn with. The limits are the limits of the voltage or current that is going to be applied to the motor in order to achieve the target velocity.
// setting target velocity
motor.target = 2;   // [rad/s]

// if in voltage control mode, you can set voltage limit
motor.updateVoltageLimit(6);  // [Volts]
// if in current control mode, you can set current limit instead of voltage limit
motor.updateCurrentLimit(0.5);  // [Amps]
Additionally, the library allows you to set the hard-limit on the target velocity by setting motor.velocity_limit variable. This means that even if you set the target velocity to a very high value, the library will not allow the motor to turn faster than the velocity_limit value. This can be useful in some applications where you want to make sure that the motor is not going to turn faster than certain velocity.
// setting velocity limit
motor.updateVelocityLimit(5);  // [rad/s]
All the limits and targets can be changed in real-time.
Efficiency considerations
Open-loop velocity is a simple but inefficient control strategy. However its efficiency and characteristics depend a lot on the torque control mode you are using. If you are using voltage control mode, the library is going to apply the voltage equal to motor.voltage_limit to the motor in order to achieve the target velocity. If you are using current control mode, the library is going to apply the current equal to motor.current_limit to the motor in order to achieve the target velocity.
Which mode should I use
| Torque Mode | Best For… | Requirements | Limits |
|---|---|---|---|
| Voltage Control | Beginners & Gimbal motors. Best for low-speed testing where you don’t know the motor parameters yet. | None | Voltage motor.voltage_limit |
| Estimated Current | Drone & High-KV motors. Much safer for low-resistance motors; provides back-EMF compensation. | Phase resistance (\(R\)) and KV rating (\(KV\)) | Current motor.current_limit |
| FOC Current | High Performance. Most efficient and robust mode; handles variable loads and speeds perfectly. | Current Sensing hardware. | Current motor.current_limit |
Read more about open-loop efficiency considerations Read more about torque control modes
Velocity open-loop control example
Here is one basic example of the velocity open-loop control with the complete configuration. The torque control mode used is estimated current. The program will set the target velocity of 1 RAD/s and maintain it, and the user can change the target velocity using serial terminal.
// Open loop motor control example
#include <SimpleFOC.h>

// BLDC motor & driver instance
// BLDCMotor( pp number , phase resistance, KV rating)
BLDCMotor motor = BLDCMotor(11 , 12.5, 100);
BLDCDriver3PWM driver = BLDCDriver3PWM(9, 5, 6, 8);

// instantiate the commander
Commander command = Commander(Serial);
void doTarget(char* cmd) { command.scalar(&motor.target, cmd); }
void doLimitCurrent(char* cmd) { command.scalar(&motor.current_limit, cmd); }

void setup() {

  // driver config
  // power supply voltage [V]
  driver.voltage_power_supply = 12;
  driver.init();
  // link the motor and the driver
  motor.linkDriver(&driver);
  // open loop control config
  motor.controller = MotionControlType::velocity_openloop;
  // torque control mode
  motor.torque_controller = TorqueControlType::estimated_current;

  // setting target velocity
  motor.target = 1;  // [rad/s]
  // limiting motor current (provided resistance)
  motor.updateCurrentLimit(0.5);   // [Amps]

  // init motor hardware
  motor.init();
  motor.initFOC();

  // add target command T
  command.add('T', doTarget, "target velocity");
  command.add('C', doLimitCurrent, "current limit");

  Serial.begin(115200);
  Serial.println("Motor ready!");
  Serial.println("Set target velocity [rad/s]");
  _delay(1000);
}

void loop() {
  // torque control loop
  motor.loopFOC();
  // open loop velocity movement
  motor.move();

  // user communication
  command.run();
}