On this page
PWM output Magnetic sensor setup
Step 1. Instantiate MagneticSensorPWM class
In order to use your PWM output magnetic position sensor with SimpleFOClibrary first create an instance of the MagneticSensorPWM class:
// MagneticSensorPWM(uint8_t _pinPWM, int _min_raw_count, int _max_raw_count)
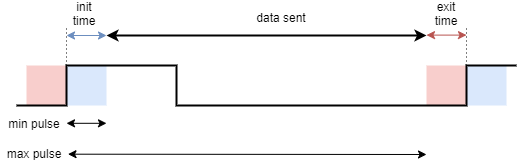
// - _pinPWM: the pin that is reading the pwm from magnetic sensor
// - _min_raw_count: the minimal length of the pulse (in microseconds)
// - _max_raw_count: the maximal length of the pulse (in microseconds)
MagneticSensorPWM sensor = MagneticSensorPWM(2, 4, 904);
The parameters of the class are
pinPWM- the pin that is reading the analog output from magnetic sensor ,min_raw_count- the smallest expected pulse time in microseconds. This is typically the length of init time of the pulsemax_raw_count- the largest pulse time in microseconds. This is the value of init pulse time plus the data sending time.
💡 Find out min and max
Every mcu is a bit different and every sensor as well so we advise you to use the provided example in theexamples/sensor_test/magentic_sensor_pwm_example/find_raw_min_maxto find out the maximal and minimal values of your sensor.
📚 See page 27 of the AS5048 datasheet or AS5600 datasheet for more in depth explanation about how the PWM sensors encode the angle. AS5048 , AS5600
Step 2. Choose the operation mode
There are two ways to use the PWM sensors implemented in this library:
- Blocking way - based on
pulselnfunction - Interrupt based, non-blocking
Blocking implementation
After the creation of the sensor class the only thing you need to do is to call the init() function. This function initializes the sensor hardware. So your final magnetic sensor code will look like:
MagneticSensorPWM sensor = MagneticSensorPWM(2, 4, 904);

void setup(){
  ...
  sensor.init();
  ...
}
If you wish to use more than one magnetic sensor, make sure you connect their chip_select pins to different arduino pins and follow the same idea as above, here is a simple example:
MagneticSensorPWM sensor1 = MagneticSensorPWM(2, 4, 904);
MagneticSensorPWM sensor2 = MagneticSensorPWM(3, 4, 904);

void setup(){
  ...
  sensor1.init();
  sensor2.init();
  ...
}
Please check the magnetic_sensor_analog_pwm.ino example to see more about it.
BEWARE: Blocking support limitations ⚠️
Blocking support for magnetic sensors is arguably has the worst performance out of all the position sensing techniques supported in this library. Each time the code reads the angle from the sensor it will read one pulse and since the magnetic sensor have PWM frequency of around 1kHz, it means the the shortest execution time for reading an angle is around 1ms. But in case of Arduino UNO and similar MCUs this might be the only option.
Interrupt based implementation
For reading the magnetic sensors asynchronously, in the non-blocking manner, this library proposes the interrupt based method. To enable this approach one needs to first create a simple buffering handler function:
// create the class
MagneticSensorPWM sensor = MagneticSensorPWM(3, 4, 904);
// create teh buffering function
void doPWM(){sensor.handlePWM();}
And then, in the setup function, user needs to call init() funciton and afterwards call the attachInterrupt function with the buffering function in the argument. Here is an example code:
// create the class
MagneticSensorPWM sensor = MagneticSensorPWM(3, 4, 904);
// create teh buffering function
void doPWM(){sensor.handlePWM();}

void setup(){
  ...
  // init the sensor
  sensor.init();
  // enable the interrupt and start reading the sensor
  sensor.enableInterrupt(doPWM);
  ...
}
And here is an example code for two sensors:
MagneticSensorPWM sensor1 = MagneticSensorPWM(2, 4, 904);
void doPWM1(){sensor1.handlePWM();}
MagneticSensorPWM sensor2 = MagneticSensorPWM(3, 4, 904);
void doPWM2(){sensor2.handlePWM();}

void setup(){
  ...
  sensor1.init();
  sensor1.enableInterrupt(doPWM1);
  sensor2.init();
  sensor2.enableInterrupt(doPWM2);
  ...
}
Make sure to look into the examples magnetic_sensor_pwm and magnetic_sensor_pwm_software_interrupt for an example of using software interrupts if you run out of hardware interrupt pins.
Step 3. Using magnetic sensor in real-time
There are two ways to use magnetic sensor implemented within this library:
- As a motor position sensor for FOC algorithm
- As a standalone position sensor
Position sensor for FOC algorithm
To use the sensor with the FOC algorithm implemented in this library, once when you have initialized sensor.init() (and possibly started the interrupts) you just need to link it to the motor by executing:
motor.linkSensor(&sensor);
And you will be able to access the angle and velocity of the motor using the motor instance:
motor.shaft_angle; // motor angle
motor.shaft_velocity; // motor velocity
or through the sensor instance:
sensor.getAngle(); // motor angle
sensor.getVelocity(); // motor velocity
Example code
Here is a quick example code for PWM magnetic sensor with a BLDC motor and driver with interrupt based sensor implementation:
#include <SimpleFOC.h>

// motor and driver
BLDCMotor motor = BLDCMotor(7);
BLDCDriver3PWM driver = BLDCDriver3PWM(9, 5, 6, 8);

// MagneticSensorPWM(uint8_t _pinPWM, int _min, int _max)
// - _pinPWM:         the pin that is reading the pwm from magnetic sensor
// - _min_raw_count:  the minimal length of the pulse (in microseconds)
// - _max_raw_count:  the maximal length of the pulse (in microseconds)
MagneticSensorPWM sensor = MagneticSensorPWM(2, 4, 904);
void doPWM(){sensor.handlePWM();}

void setup() {
  // driver
  driver.init()
  motor.linkDriver(&driver);

  // init magnetic sensor hardware
  sensor.init();
  //enable interrupts
  sensor.enableInterrupt(doPWM);
  motor.linkSensor(&sensor);

  // init motor hardware
  motor.init();
  motor.initFOC();

  Serial.println("Motor ready");
  _delay(1000);
}
void loop(){
  motor.loopFOC();
  motor.move();
}
Standalone sensor
To get the magnetic sensor angle and velocity at any given time you can use the public methods:
class MagneticSensorPWM{
 public:
    // shaft velocity getter
    float getVelocity();
  	// shaft angle getter
    float getAngle();
}
Calling
getVelocitymultiple timesWhen calling
getVelocityit will only calculate the velocity if the elapsed time from the previous call is longer than the time specified in the variablemin_elapsed_time(default 100us). If the elapsed time from the last call is shorter thanmin_elapsed_timethe function will return previously calculated value. Variablemin_elapsed_timecan be changed easily if necessary:sensor.min_elapsed_time = 0.0001; // 100us by default
Example code
Here is a quick example for AS5048A magnetic sensor using its PWM output:
#include <SimpleFOC.h>

// MagneticSensorPWM(uint8_t _pinPWM, int _min, int _max)
// - _pinPWM:         the pin that is reading the pwm from magnetic sensor
// - _min_raw_count:  the minimal length of the pulse (in microseconds)
// - _max_raw_count:  the maximal length of the pulse (in microseconds)
MagneticSensorPWM sensor = MagneticSensorPWM(2, 4, 904);
void doPWM(){sensor.handlePWM();}

void setup() {
  // monitoring port
  Serial.begin(115200);

  // initialise magnetic sensor hardware
  sensor.init();
  // comment out to use sensor in blocking (non-interrupt) way
  sensor.enableInterrupt(doPWM);

  Serial.println("Sensor ready");
  _delay(1000);
}

void loop() {
  // IMPORTANT - call as frequently as possible
  // update the sensor values
  sensor.update();
  // display the angle and the angular velocity to the terminal
  Serial.print(sensor.getAngle());
  Serial.print("\t");
  Serial.println(sensor.getVelocity());
}