On this page
Writing the code
Once you have all the hardware connected:
- Microcontroller
- BLDC or stepper motor
- Position sensor
- Power supply
we can start the most exciting part, coding!
SimpleFOCMini is fully supported by Arduino SimpleFOClibrary, therefore please make sure you have the newest version of the SimpleFOClibrary installed. If you still did not get your owm version of the library please follow the installation instructions.
Suggested approach when starting coding for the Arduino SimpleFOCMini is:
- Test the sensor
- Test the driver
- Voltage motion control
- More complex control strategies - position and velocity
You can also follow our Getting started guide!
Step 1. Testing the sensor (if you have a sensor)
First make sure your sensor works properly, this takes about 10 mins.
Step 1: Complete the sensor test here
Step 2. Testing the driver
SimpleFOCMini is a 3PWM BLDC driver board, with SimpleFOClibrary it will always use the BLDCDriver3PWM class.
BLDCDriver3PWM driver = BLDCDriver3PWM(pwmA, pwmB, pwmC, enable);
Replace the pwmA, pwmB, pwmC, and enable with the actual pin numbers you have chosen in the hardware configuration.
Once you have the pins please complete the step 2 of the getting started guide.
Step 2: Complete the driver test here
If the code compiles and uploads this basically means that your driver is correctly connected and ready for the next steps.
Now we can connect the motor and proceed with the open-loop test. If you have a BLDC motor connected to your driver instantiate it
BLDCMotor motor = BLDCMotor(pole_pairs);
Replace pole_pairs with the actual number of pole pairs of your BLDC motor.
If you have a stepper motor connected to your driver instantiate it similarly:
HybridStepperMotor motor = HybridStepperMotor(pole_pairs); // pole_pairs is steps per revolution / 4 (ex. 200/4 = 50 for nema 17)
Hybrid stepper PWM pin order
When using mini with a stepper motor, make sure to connect the PWM pins in the correct order as required by the hybrid stepper motor driver. When declaring the
BLDCDriver3PWMinstance, the 3rd PWM pin should correspond to the common phase of the stepper motor.BLDCDriver3PWM driver = BLDCDriver3PWM(A+, B+, B-(A-), enable); // the 3rd PWM pin should be connected to the common phase of the stepper motorFor example if the stepper is connected with A+ to M1(IN1), B+ to M3(IN3) and B-/A- are connected together to M2(IN2) the class declaration should match this connection.
BLDCDriver3PWM driver = BLDCDriver3PWM(IN1, IN3, IN2, enable); // M2(IN2) should be connected to the common phase of the stepper motor
So now you have your motor instantiated and you can proceed with the open-loop test.
Step 3: Complete the open-loop test here
Step 3. Closing the loop
Once you have completed the open-loop test successfully, you can proceed to close the control loop by enabling the FOC algorithm in your code.
Step 4: Closing the loop guide here
Step 4. FOC control using current sensing (optional)
When the closed-loop voltage torque control works properly, you can enhance the performance of your motor by enabling current sensing. This allows for more precise control of the motor’s torque and can improve overall system stability.
Make sure that your microcontroller supports low-side current sensing. See more here. The code for enabling current sensing can be found in the guide linked below.
For BLDC motors use:
LowSideCurrentSense current_sense = LowSideCurrentSense(150.0f, CS1, CS2, CS3);
For steppers (where the common phase is connected to the 2nd phase IN2/M2):
LowSideCurrentSense current_sense = LowSideCurrentSense(150.0f, CS1, CS3);
Step 5: Enabling current sensing guide here
Example of a complete code
This example uses a Gimbal motor, mini, nucleo board and an encoder. The same setup as in this example project.
SimpleFOCMini V1.0 SimpleFOCMini V1.1 SimpleFOCMini V2.3
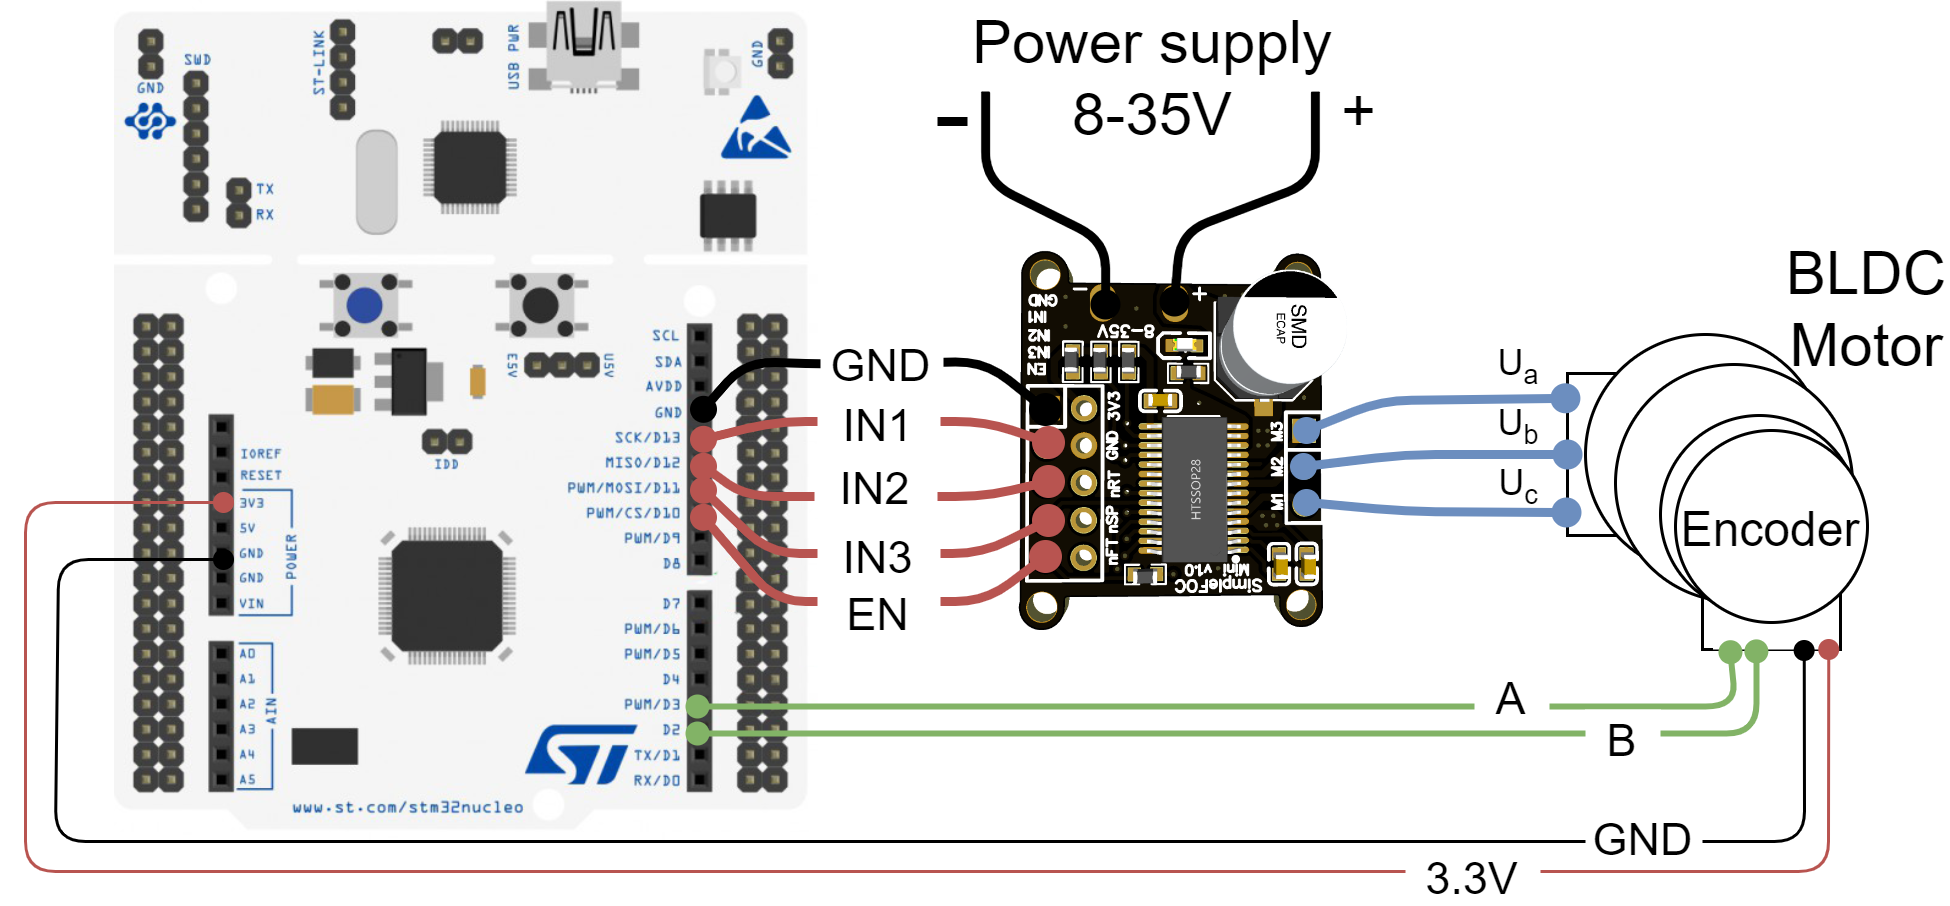
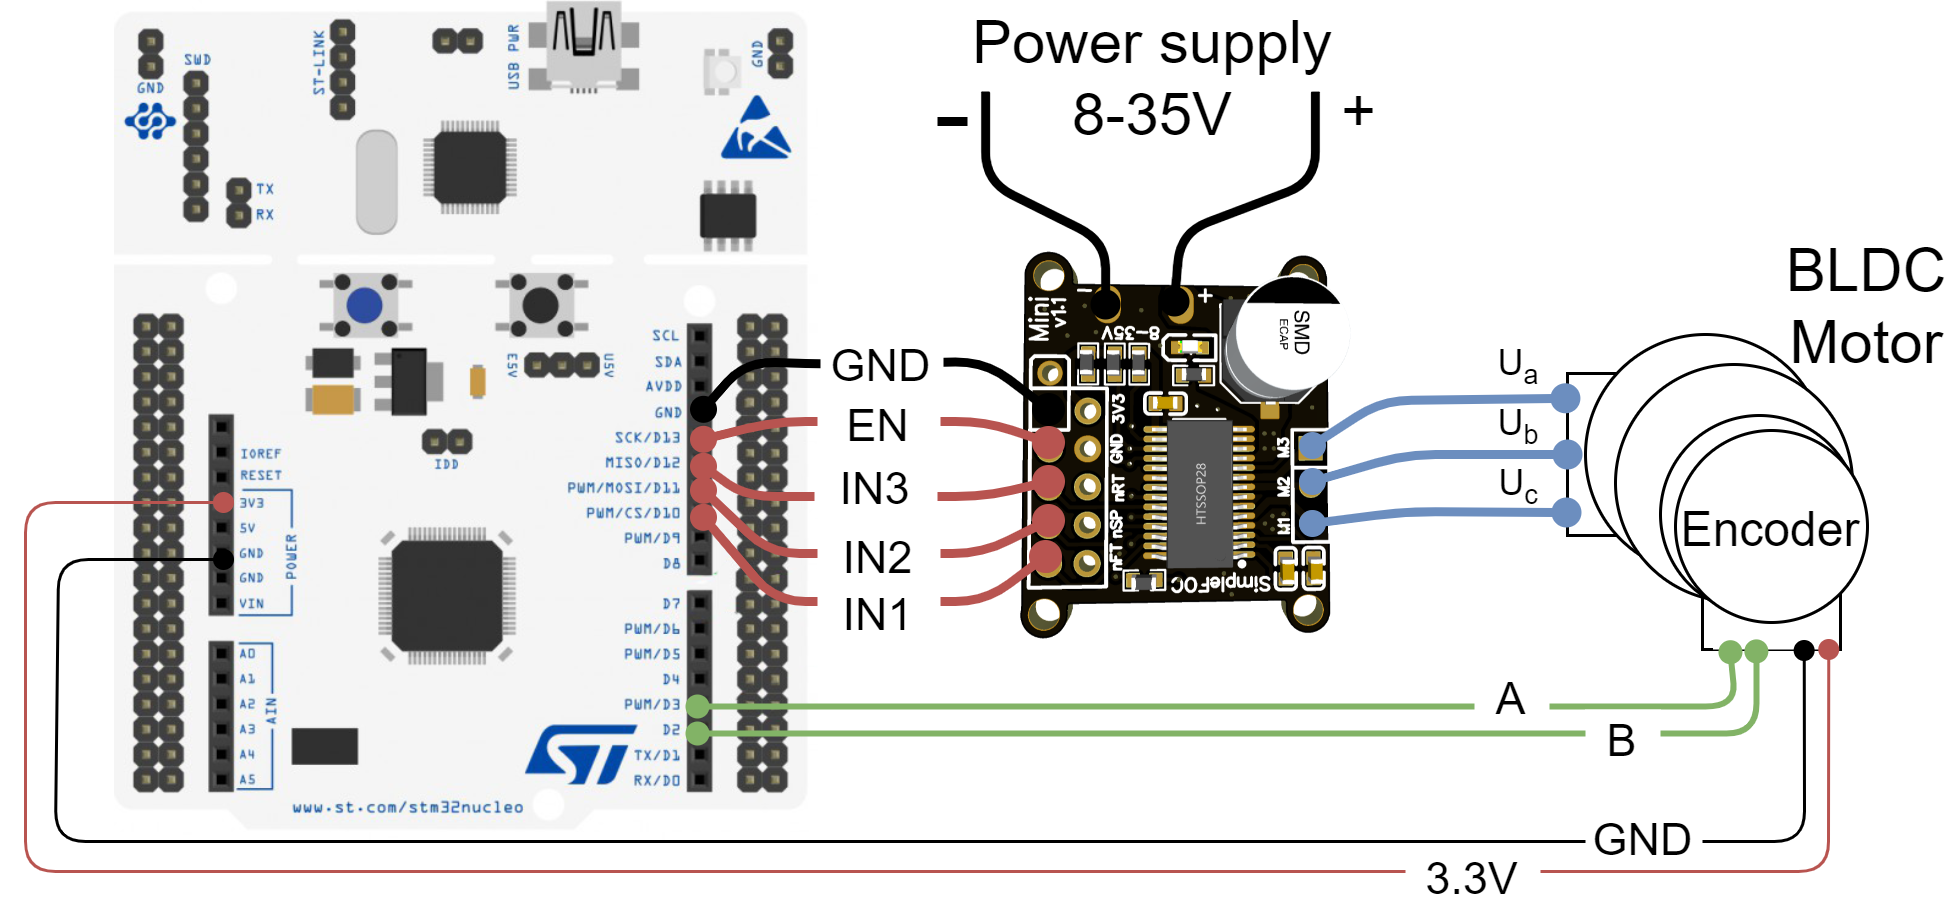
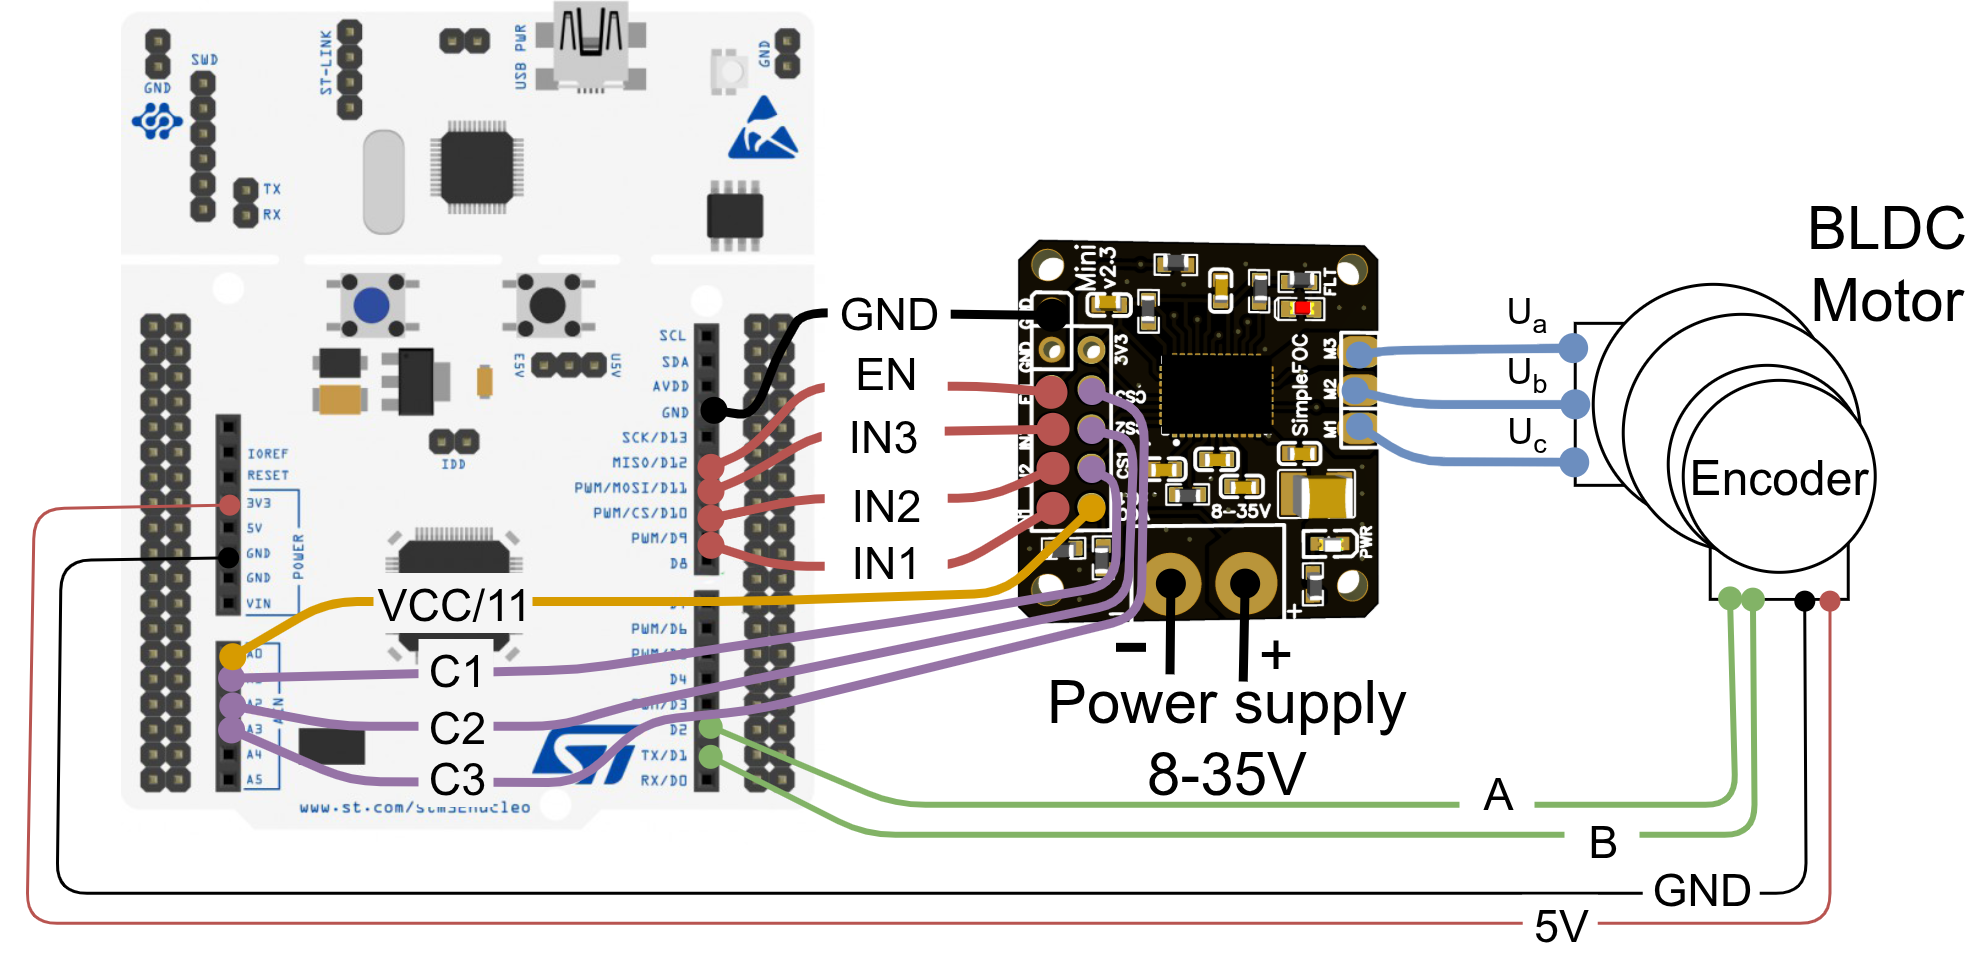
#include <SimpleFOC.h>
// init BLDC motor
BLDCMotor motor = BLDCMotor( 11 );
// init driver
BLDCDriver3PWM driver = BLDCDriver3PWM(10, 11, 12, 13);
// init encoder
Encoder encoder = Encoder(2, 3, 2048);
// channel A and B callbacks
void doA(){encoder.handleA();}
void doB(){encoder.handleB();}
// current sense configuration (mini v2.3+)
LowsideCurrentSense current_sense = LowsideCurrentSense( 150.0f, A1, A2, A3 );
// commander interface
Commander command = Commander(Serial);
void onTarget(char* cmd){ command.motion(&motor, cmd); }
void setup() {
// initialize encoder hardware
encoder.init();
// hardware interrupt enable
encoder.enableInterrupts(doA, doB);
// link the motor to the sensor
motor.linkSensor(&encoder);
// Read the actual power supply voltage using the voltage divider on pin A0
float VccReading = _readRegularADCVoltage(A0)*11.0f;
// power supply voltage
// default 12V
driver.voltage_power_supply = VccReading;
driver.init();
// link the motor to the driver
motor.linkDriver(&driver);
// link driver to current sense
current_sense.linkDriver(&driver);
// init current sense
if(!current_sense.init()){
Serial.println("Current sense init failed!");
return;
}
// link current sense to motor
motor.linkCurrentSense(¤t_sense);
// set control loop to be used
motor.controller = MotionControlType::angle;
// controller configuration based on the control type
// velocity PI controller parameters
// default P=0.5 I = 10
motor.PID_velocity.P = 0.2;
motor.PID_velocity.I = 20;
//default voltage_power_supply
motor.voltage_limit = 6;
// velocity low pass filtering
// default 5ms - try different values to see what is the best.
// the lower the less filtered
motor.LPF_velocity.Tf = 0.02;
// angle P controller
// default P=20
motor.P_angle.P = 20;
// maximal velocity of the position control
// default 20
motor.velocity_limit = 4;
// initialize motor
motor.init();
// align encoder and start FOC
motor.initFOC();
// add target command T
command.add('T', doTarget, "motion control");
// monitoring port
Serial.begin(115200);
Serial.println("Motor ready.");
Serial.println("Set the target angle using serial terminal:");
_delay(1000);
}
void loop() {
// iterative FOC function
motor.loopFOC();
// function calculating the outer position loop and setting the target position
motor.move();
// commander interface with the user
commander.run();
}