On this page
Tuning the Velocity Control Loop
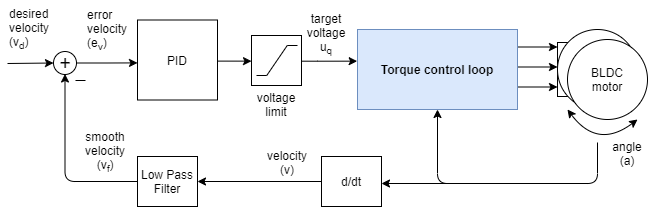

Tuning a velocity loop is a balancing act between responsiveness (getting to velocity quickly) and stability (avoiding vibration).
1. Configure the Filter (motor.LPF_velocity.Tf)
Before tuning gains, you must smooth the “noise” from the velocity calculation. The low-pass filter time constant motor.LPF_velocity.Tf prevents sensor jitter from vibrating the motor, but setting it too high introduces phase lag, which causes oscillation.
- Rule of Thumb: Set the filter’s cutoff frequency to roughly 5 times the maximum frequency the motor will spin.
- Example If your max velocity is \(100\text{ rad/s}\) (~\(16\text{ Hz}\)), you want a filter cutoff around \(80\text{ Hz}\).
float max_velocity = 100.0;                       // rad/s
float motor_frequency_hz = max_velocity / (2 * PI); // ~16 Hz
float filter_cutoff_hz = motor_frequency_hz * 5;    // ~80 Hz

// Tf = 1 / (2 * PI * f_cutoff)
motor.LPF_velocity.Tf = 1.0 / (2.0 * PI * filter_cutoff_hz);
This approach give you a good starting point for the filter. You can adjust it up or down based on how much noise you have and how responsive you want the motor to be. If the motor is vibrating at low velocities, increase motor.LPF_velocity.Tf. If the motor feels sluggish, decrease motor.LPF_velocity.Tf.
Also the max velocity is application dependent.
- If you have a high velocity motor but you only need to run it at low velocities, you can set the filter cutoff based on the max velocity you need rather than the max velocity of the motor. This will allow you to have a smoother response at low velocities.
- If you need to run the motor in its full velocity range, then you should set the filter cutoff based on the max velocity of the motor and adapt the PID gains accordingly to have a good response in the full velocity range.
Tip: Velocity oscilates between 0 and a high value
If your sensor is very noisy, especially if the velocity oscillates between 0 and a high value, for example if using the example code from
examples/utils/sensor_test, before setting the low pass filter, increase first the time between the velocity calculations by settingsensor.min_elapsed_time = 0.001 // 1ms - default value is 0.0001 (100us)The default value is 100 microseconds which is very low for very fast microcontrollers such. Especially if the sensor resolution is low.
2. Proportional Gain (motor.PID_velocity.P)
The motor.PID_velocity.P gain determines the “stiffness” of your loop.
- Start with
motor.PID_velocity.P,motor.PID_velocity.Iandmotor.PID_velocity.Dequal to0. - Set a target velocity and gradually increase
motor.PID_velocity.Puntil the motor starts to rotate and reaches the target speed. - Continue increasing
motor.PID_velocity.Puntil the motor begins to vibrate or produce a high-pitched hum. - Back it off: Set
motor.PID_velocity.Pto about 50% to 70% of that unstable value.
3. Integral Gain (motor.PID_velocity.I)
The motor.PID_velocity.I gain ensures the motor actually reaches the target speed and stays there under load.
- Increase
motor.PID_velocity.Igradually to speed up the response. - The motor should be able to keep the target speed even when you apply a load (e.g., by hand).
- If the motor “hunts” (oscillates slowly back and forth around the target), the
motor.PID_velocity.Igain is too high. - Note: Typical
motor.PID_velocity.Ivalue is significantly larger thanmotor.PID_velocity.P(often by a factor of 10 to 100).
4. Derivative Gain (motor.PID_velocity.D)
- Leave at 0. In velocity control,
motor.PID_velocity.Dis rarely needed because velocity is already a derivative of position. - Adding
motor.PID_velocity.Dusually just amplifies sensor noise and makes the motor run hot. Only use it if you have an extremely high-resolution encoder and significant mechanical overshoot thatmotor.PID_velocity.Pandmotor.PID_velocity.Icannot solve.
Quick Reference Table
| Parameter | Typical Starting Value | If too low… | If too high… |
|---|---|---|---|
| T_f | 0.001 (approx) | Motor sounds “crunchy” or noisy. | Motor overshoots and oscillates wildly. |
| P Gain | 0.01 | Motor feels “mushy” and weak. | Motor vibrates or high-pitch squeals. |
| I Gain | 0.5 | Motor never reaches target speed. | Motor “surges” or breathes slowly. |
| D Gain | 0 | No effect. | Motor runs hot and noisy. |
Tunning with hardware
There are two main ways to tune the velocity loop - with hardware and without hardware.
- Connecting to your motor with Serial communication and using the commander interface
- Using GUI tools such as such as SimpleFOC Studio to tune the parameters in real-time and visualize the response of the motor.
Here is an example of how to tune the velocity loop using the commander interface.
#include <SimpleFOC.h>

// magnetic sensor instance - SPI
MagneticSensorSPI sensor = MagneticSensorSPI(AS5147_SPI, 10);

// BLDC motor & driver instance
BLDCMotor motor = BLDCMotor(11);
BLDCDriver3PWM driver = BLDCDriver3PWM(9, 5, 6, 8);

// commander interface
Commander command = Commander(Serial);
void onPID(char* cmd){ command.pid(&motor.PID_velocity, cmd); }
void onLPF(char* cmd){ command.lpf(&motor.LPF_velocity, cmd); }
void onMotion(char* cmd){ command.motion(&motor, cmd); }

void setup() {
  // monitoring port
  Serial.begin(115200);
  // enable the debugging output
  SimpleFOCDebug::enable(&Serial);

  // initialise magnetic sensor hardware
  sensor.init();
  // link the motor to the sensor
  motor.linkSensor(&sensor);

  // driver config
  // power supply voltage [V]
  driver.voltage_power_supply = 12;
  driver.init();
  // link driver
  motor.linkDriver(&driver);

  // set control loop type to be used
  motor.controller = MotionControlType::velocity;
  // set torque control type to voltage
  motor.torque_controller = TorqueControlType::voltage;

  // contoller configuration based on the control type
  motor.PID_velocity.P = 0;
  motor.PID_velocity.I = 0;
  motor.PID_velocity.D = 0;

  // calculate the filter time constant
  // based on the max velocity you need
  // and the rule of thumb for the cutoff frequency
  float max_velocity = 100.0;                       // rad/s
  float motor_frequency_hz = max_velocity / (2 * PI); // ~16 Hz
  // velocity low pass filtering time constant
  motor.LPF_velocity.Tf = 1.0 / (2.0 * PI * motor_frequency_hz * 5); // ~80 Hz

  // use monitoring with serial for motor init
  // comment out if not needed
  motor.useMonitoring(Serial);

  // initialise motor
  motor.init();
  // align encoder and start FOC
  motor.initFOC();

  // set the inital target value
  motor.target = 2; // Rad / sec

  // define the motor id
  command.add('V', onPID, "pid");
  command.add('L', onLPF, "lpf");
  command.add('M', onMotion, "motion");
  command.decimal_places = 5; // for better visibility of the changes in the parameters

  // Run user commands to configure and the motor (find the full command list in docs.simplefoc.com)
  Serial.println(F("Target velocity : target 2 Rad/sec."));
  Serial.println(F("Set/Read the PID gains with: V"));
  Serial.println(F("Set/Read the LPF time constant with: L"));
  Serial.println(F("Set the motion target with: M"));

  // print current values
  Serial.println(F("Current PID gains:"));
  Serial.print(F("P: ")); Serial.println(motor.PID_velocity.P);
  Serial.print(F("I: ")); Serial.println(motor.PID_velocity.I);
  Serial.print(F("D: ")); Serial.println(motor.PID_velocity.D);
  Serial.print(F("Current LPF Tf: ")); Serial.println(motor.LPF_velocity.Tf);

  _delay(1000);
}


void loop() {
  // iterative setting of the FOC phase voltage
  motor.loopFOC();

  // iterative function setting the outter loop target
  // velocity, position or voltage
  // if target not set in parameter uses motor.target variable
  motor.move();

  // user communication
  command.run();
}
You should see something like this in the serial monitor:
...
MOT: Ready.
Target velocity : target 2 Rad/sec.
Set/Read the PID gains with: V
Set/Read the LPF time constant with: L
Set the motion target with: M
Current PID gains:
P: 0.0000
I: 0.0000
D: 0.0000
Current LPF Tf: 0.00200
And then you can update the PID parameters using the commander interface - see the commander documentation for more details on how to use the commander interface and the available commands.
- For PID paramerter - see here
- P gain -
VP(read) ,VP0.1(write) - I gain -
VI(read) ,VI0.01(write) - D gain -
VD(read) ,VD0.001(write)
- P gain -
- For LPF parameter - see here
- LPF time constant -
LF(read) ,LF0.001(write)
- LPF time constant -
- For motion target - see here
- Velocity target -
MV0.5(write - set velocity target to 0.5 rad/s)
- Velocity target -