This motion control mode is enabled setting the controller parameter to:
// torque control loopmotor.controller=MotionControlType::torque;
In this mode the user can control the motor torque directly by setting the motor.target variable to the desired torque value. The torque control loop will then calculate the necessary voltage or current to be applied to the motor in order to achieve the desired torque.
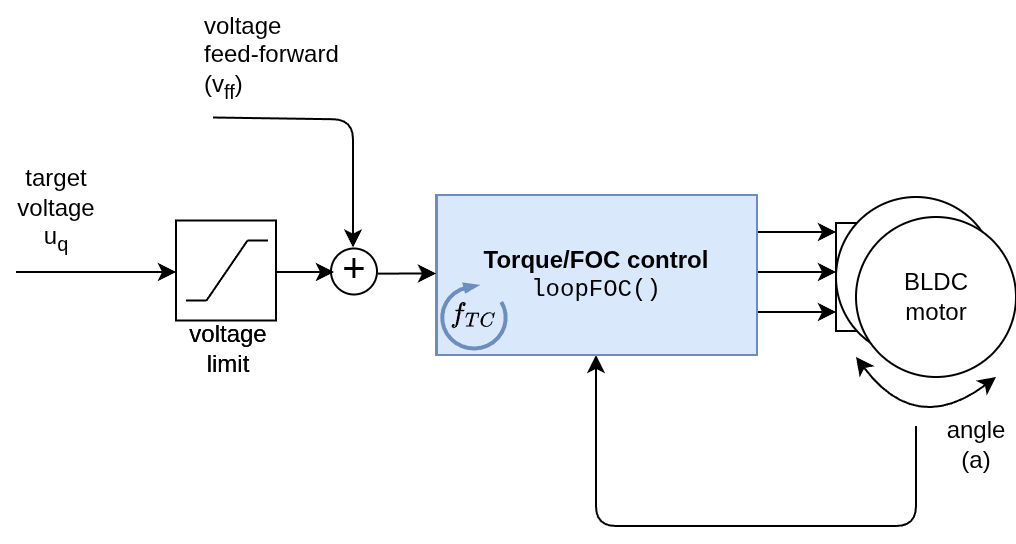
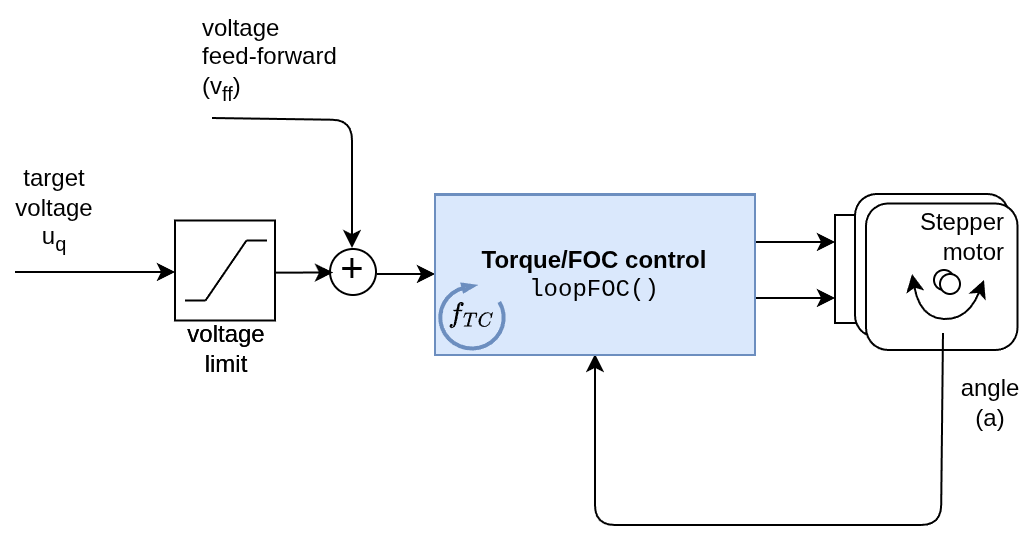
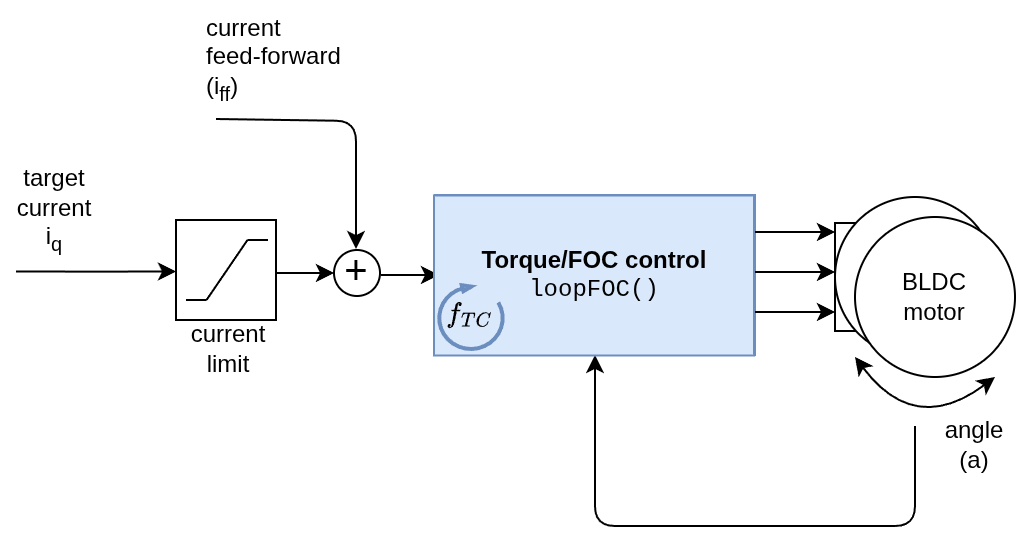
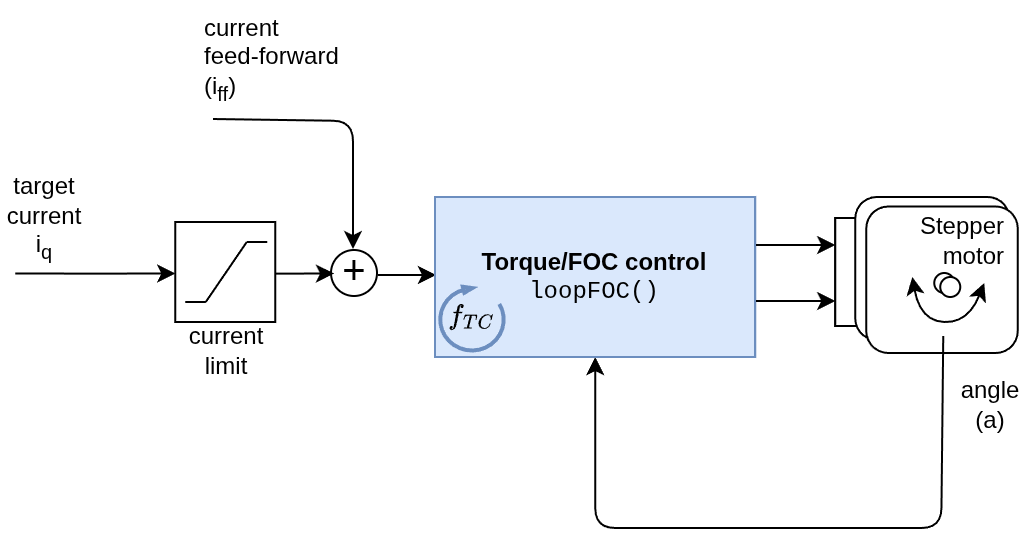
Depending on the torque control mode used, the input to the torque control loop will be either the target voltage uq or the target current iq.
If the voltage mode is used, the input in the control loop will be the target voltage uq.
And if one of the current based torque control modes (estimated current, DC current or FOC current) is used, the input in the control loop will be the target current iq.
Control parameters
This motion control mode does not have any additional parameters on its own. It relies entirely on the underlying torque control mode.
The only real parameter of the torque control motion control is the limit enforeced on the target variable motor.target and the actual voltage or current applied to the motor. This can be set by either limiting the voltage or the current, depending on the torque control mode used. For example if using voltage mode you can limit the voltage by setting
motor.updateVoltageLimit(2.0);// set the voltage limit to 2 V// or less preferred waymotor.voltage_limit=2.0;// limit the voltage to 2 V
And if using current mode you can limit the current by setting
motor.updateCurrentLimit(0.5);// set the current limit to 0.5 A// or less preferred waymotor.current_limit=0.5;// limit the current to 0.5 A
Target & Feed-forward terms
SimpleFOClibrary in addition to the target variable motor.target also allows you to add feed-forward terms to the torque control loop. There are two feed-forward terms that can be added to the torque control loop:
Term
Variable
Description
Used in Modes
Units
Target
motor.target
This is the main input to the torque control loop, represents the desired current/voltage to be applied to the motor.
Current mode Voltage mode
Amps Volts
Current feed-forward
motor.feed_forward_current
This term adds a constant current to the torque control loop. For example, it can be used to compensate for friction or other constant loads on the motor.
Current mode
Amps
Voltage feed-forward
motor.feed_forward_voltage
This term adds a constant voltage to the torque control loop. For example, it can be used to compensate for back-EMF or other voltage drops in the system.
The target variable you can set and modify in runtime
// set the target variablemotor.target=0.5;// set the target current/voltage to 0.5 A or V depending on the torque control mode
From current and voltage to torque
Both voltage and current do not represent the actual torque of the motor. The actual torque can be calculated by multiplying the current by the motor’s torque constant \(K_t\). So the target variable is proportional to the actual torque of the motor and controls it indirectly.
\[\tau = K_t \cdot i_q\]
If using voltage mode, there is no simple way to corelate it with the actual torque, except for slow speeds where the back-EMF is negligible and the motor current can be calculated as \(i_q = \frac{u_q}{R}\) (\(R\) is the motor phase resistance), making the torque proportional to the voltage:
\[\tau \propto u_q\]
Therefore in this mode the target variable is only proportional to the torque at low speeds. While the torque will decrease as the speed increases due to the back-EMF.
Both feed-forward terms have q and d components, but only the q component is actually used for torque generation.
To set the feed-forward terms, you modify these variables directly in runtime:
// set current feed-forward termmotor.feed_forward_current.q=0.1;// add 0.1 A to the q-axis current// set voltage feed-forward termmotor.feed_forward_voltage.q=0.1;// add 0.1 V to the q-axis voltage
One can also set the d-axis feed-forward terms in the same way
// set current feed-forward termmotor.feed_forward_current.d=0.1;// add 0.1 A to the d-axis current// set voltage feed-forward termmotor.feed_forward_voltage.d=0.1;// add 0.1 V to the d-axis voltage
Be careful with feed-forward terms
The feed-forward terms can be very useful for improving the performance of the control loop, but they can also cause instability if not used carefully. They are intended for advanced users who have a good understanding of the system and the control loop. If you are not sure about how to use them, it is recomended not to use them.
Torque control behavior
There two distinct behaviours of the motor when using torque control mode, depending on the torque control mode used:
If using voltage mode
If using current mode
Voltage mode
In voltage mode, the motor will behave as if it is being controlled by a voltage source. You can imagine it as if you have a DC motor and you are controlling the voltage applied to it. The higher the voltage, the higher the torque, but also the higher the speed the motor can reach. When the motor is static, the torque is proportional to the voltage. However, as the motor starts to move, the back-EMF (electromotive force) generated by the motor will oppose the applied voltage, making the actual torque decrease as the speed increases. This means that at higher speeds, the motor will not be able to reach the same torque as at lower speeds.
RULE OF THUMB
For voltage mode remember: the higher the voltage, the higher the speed the motor can reach. Or in other words voltage is proportional to speed.
Current mode
In current mode, the motor will behave as if it is being controlled by a current source. The torque will be directly proportional to the current, regardless of the speed of the motor, and ideally the motor is able to maintain the same torque at all speeds. This is because the current control loop will adjust the voltage applied to the motor in order to maintain the desired current, even as the back-EMF changes with speed.
In current mode, the motor will be able to reach high velocities even with very low current target. The current is not proportional to the speed, but to the acceleration of the motor. This means that if you set a low current target, the motor will accelerate slowly, but it can still reach high speeds if given enough time. Conversely, if you set a high current target, the motor will accelerate quickly and reach high speeds faster.
RULE OF THUMB
For current mode remember: the higher the current, the faster the motor will accelerate. Or in other words current is proportional to acceleration.
Here is one basic example of the code for the torque control with voltage mode. The code will initialize the motor, driver and sensor, set the control mode to torque control with voltage mode and set the target voltage to 1 V.
#include<SimpleFOC.h>// motor instanceBLDCMotormotor=BLDCMotor(pole_pairs);// driver instanceBLDCDriver3PWMdriver=BLDCDriver3PWM(pwmA,pwmB,pwmC,enable);// Magnetic sensor instanceMagneticSensorSPIAS5x4x=MagneticSensorSPI(AS5047_SPI,chip_select);voidsetup(){// initialize magnetic sensor hardwareAS5x4x.init();// link the motor to the sensormotor.linkSensor(&AS5x4x);// driver configdriver.voltage_power_supply=12;// voltage of power supply driver.init();motor.linkDriver(&driver);// set motion control loop to be usedmotor.controller=MotionControlType::torque;// set torque control mode to voltagemotor.torque_controller=TorqueControlType::voltage;// set the voltage limit for the torque control loopmotor.updateVoltageLimit(2);// Volts// use monitoring with serial Serial.begin(115200);// comment out if not neededmotor.useMonitoring(Serial);// initialize motormotor.init();// align sensor and start FOCmotor.initFOC();// set the target voltage to 1 Vmotor.target=1;// VoltsSerial.println("Motor ready.");_delay(1000);}voidloop(){// main FOC algorithm functionmotor.loopFOC();// Motion control functionmotor.move();}
Here is one basic example of the code for the torque control with estimated current mode. The code will initialize the motor, driver and sensor, set the control mode to torque control with estimated current mode and set the target current to 1 A.
IMPORTANT NOTE: The estimated current mode requires setting the motor parameters, such as phase resistance, KV rating and inductance. If these parameters are not set correctly, the estimated current mode will not work properly and the motor may not behave as expected. See more details in the torque control docs.
#include<SimpleFOC.h>// motor instanceBLDCMotormotor=BLDCMotor(pole_pairs,phase_resistance,KV_rating,inductance_q,inductance_d);// driver instanceBLDCDriver3PWMdriver=BLDCDriver3PWM(pwmA,pwmB,pwmC,enable);// Magnetic sensor instanceMagneticSensorSPIAS5x4x=MagneticSensorSPI(AS5047_SPI,chip_select);voidsetup(){// initialize magnetic sensor hardwareAS5x4x.init();// link the motor to the sensormotor.linkSensor(&AS5x4x);// driver configdriver.voltage_power_supply=12;// voltage of power supply driver.init();motor.linkDriver(&driver);// set motion control loop to be usedmotor.controller=MotionControlType::torque;// set torque control mode to estimated currentmotor.torque_controller=TorqueControlType::estimated_current;// set the current limit for the torque control loopmotor.updateCurrentLimit(2);// Amps// use monitoring with serial Serial.begin(115200);// comment out if not neededmotor.useMonitoring(Serial);// initialize motormotor.init();// align sensor and start FOCmotor.initFOC();// set the target current to 1 Amotor.target=1;// AmpsSerial.println("Motor ready.");_delay(1000);}voidloop(){// main FOC algorithm functionmotor.loopFOC();// Motion control functionmotor.move();}
Here is one basic example of the code for the torque control with FOC current mode. The code will initialize the motor, driver, sensor and current sense, set the control mode to torque control with FOC current mode and set the target current to 1 A.
IMPORTANT NOTE: The FOC current mode requires current sensing to be used. If no current sensing available, try estimated current mode, which does not require current sensing, but relies on the motor parameters to estimate the current. See more details in the torque control docs.
#include<SimpleFOC.h>// motor instanceBLDCMotormotor=BLDCMotor(pole_pairs);// driver instanceBLDCDriver3PWMdriver=BLDCDriver3PWM(pwmA,pwmB,pwmC,enable);// Magnetic sensor instanceMagneticSensorSPIAS5x4x=MagneticSensorSPI(AS5047_SPI,chip_select);// Current sensingInlineCurrentSensecurrent_sense=InlineCurrentSense(R_shunt,amp_gain,cs_A,cs_B);voidsetup(){// initialize magnetic sensor hardwareAS5x4x.init();// link the motor to the sensormotor.linkSensor(&AS5x4x);// driver configdriver.voltage_power_supply=12;// voltage of power supply driver.init();motor.linkDriver(&driver);// set motion control loop to be usedmotor.controller=MotionControlType::torque;// set torque control mode to FOC currentmotor.torque_controller=TorqueControlType::foc_current;// set the current limit for the torque control loopmotor.updateCurrentLimit(2);// Amps// initialize current sensing hardwarecurrent_sense.init();motor.linkCurrentSense(¤t_sense);// use monitoring with serial Serial.begin(115200);// comment out if not neededmotor.useMonitoring(Serial);// initialize motormotor.init();// align sensor and start FOCmotor.initFOC();// set the target current to 1 Amotor.target=1;// AmpsSerial.println("Motor ready.");_delay(1000);}voidloop(){// main FOC algorithm functionmotor.loopFOC();// Motion control functionmotor.move();}
Here is one basic example of the code for the torque control with voltage mode. The code will initialize the motor, driver and sensor, set the control mode to torque control with voltage mode and set the target voltage to 1 V.
#include<SimpleFOC.h>// motor instanceStepperMotormotor=StepperMotor(pole_pairs);// driver instanceStepperDriver4PWMdriver=StepperDriver4PWM(pwmA,pwmB,pwmC,pwmD);// Magnetic sensor instanceMagneticSensorSPIAS5x4x=MagneticSensorSPI(AS5047_SPI,chip_select);voidsetup(){// initialize magnetic sensor hardwareAS5x4x.init();// link the motor to the sensormotor.linkSensor(&AS5x4x);// driver configdriver.voltage_power_supply=12;// voltage of power supply driver.init();motor.linkDriver(&driver);// set motion control loop to be usedmotor.controller=MotionControlType::torque;// set torque control mode to voltagemotor.torque_controller=TorqueControlType::voltage;// set the voltage limit for the torque control loopmotor.updateVoltageLimit(2);// Volts// use monitoring with serial Serial.begin(115200);// comment out if not neededmotor.useMonitoring(Serial);// initialize motormotor.init();// align sensor and start FOCmotor.initFOC();// set the target voltage to 1 Vmotor.target=1;Serial.println("Motor ready.");_delay(1000);}voidloop(){// main FOC algorithm functionmotor.loopFOC();// Motion control functionmotor.move();}
Here is one basic example of the code for the torque control with estimated current mode. The code will initialize the motor, driver and sensor, set the control mode to torque control with estimated current mode and set the target current to 1 A.
IMPORTANT NOTE: The estimated current mode requires setting the motor parameters, such as phase resistance, KV rating and inductance. If these parameters are not set correctly, the estimated current mode will not work properly and the motor may not behave as expected. See more details in the torque control docs.
#include<SimpleFOC.h>// motor instanceStepperMotormotor=StepperMotor(pole_pairs,phase_resistance,KV_rating,inductance_q,inductance_d);// driver instanceStepperDriver4PWMdriver=StepperDriver4PWM(pwmA,pwmB,pwmC,pwmD);// Magnetic sensor instanceMagneticSensorSPIAS5x4x=MagneticSensorSPI(AS5047_SPI,chip_select);voidsetup(){// initialize magnetic sensor hardwareAS5x4x.init();// link the motor to the sensormotor.linkSensor(&AS5x4x);// driver configdriver.voltage_power_supply=12;// voltage of power supply driver.init();motor.linkDriver(&driver);// set motion control loop to be usedmotor.controller=MotionControlType::torque;// set torque control mode to estimated currentmotor.torque_controller=TorqueControlType::estimated_current;// set the current limit for the torque control loopmotor.updateCurrentLimit(2);// Amps// use monitoring with serial Serial.begin(115200);// comment out if not neededmotor.useMonitoring(Serial);// initialize motormotor.init();// align sensor and start FOCmotor.initFOC();// set the target current to 1 Amotor.target=1;// AmpsSerial.println("Motor ready.");_delay(1000);}voidloop(){// main FOC algorithm functionmotor.loopFOC();// Motion control functionmotor.move();}
Here is one basic example of the code for the torque control with FOC current mode. The code will initialize the motor, driver, sensor and current sense, set the control mode to torque control with FOC current mode and set the target current to 1 A.
IMPORTANT NOTE: The FOC current mode requires current sensing to be used. If no current sensing available, try estimated current mode, which does not require current sensing, but relies on the motor parameters to estimate the current. See more details in the torque control docs.
#include<SimpleFOC.h>// motor instanceStepperMotormotor=StepperMotor(pole_pairs);// driver instanceStepperDriver4PWMdriver=StepperDriver4PWM(pwmA,pwmB,pwmC,pwmD);// Magnetic sensor instanceMagneticSensorSPIAS5x4x=MagneticSensorSPI(AS5047_SPI,chip_select);// Current sensingInlineCurrentSensecurrent_sense=InlineCurrentSense(R_shunt,amp_gain,cs_A,cs_B);voidsetup(){// initialize magnetic sensor hardwareAS5x4x.init();// link the motor to the sensormotor.linkSensor(&AS5x4x);// driver configdriver.voltage_power_supply=12;// voltage of power supply driver.init();motor.linkDriver(&driver);// set motion control loop to be usedmotor.controller=MotionControlType::torque;// set torque control mode to FOC currentmotor.torque_controller=TorqueControlType::foc_current;// set the current limit for the torque control loopmotor.updateCurrentLimit(2);// Amps// initialize current sensing hardwarecurrent_sense.init();motor.linkCurrentSense(¤t_sense);// use monitoring with serial Serial.begin(115200);// comment out if not neededmotor.useMonitoring(Serial);// initialize motormotor.init();// align sensor and start FOCmotor.initFOC();// set the target current to 1 Amotor.target=1;// AmpsSerial.println("Motor ready.");_delay(1000);}voidloop(){// main FOC algorithm functionmotor.loopFOC();// Motion control functionmotor.move();}
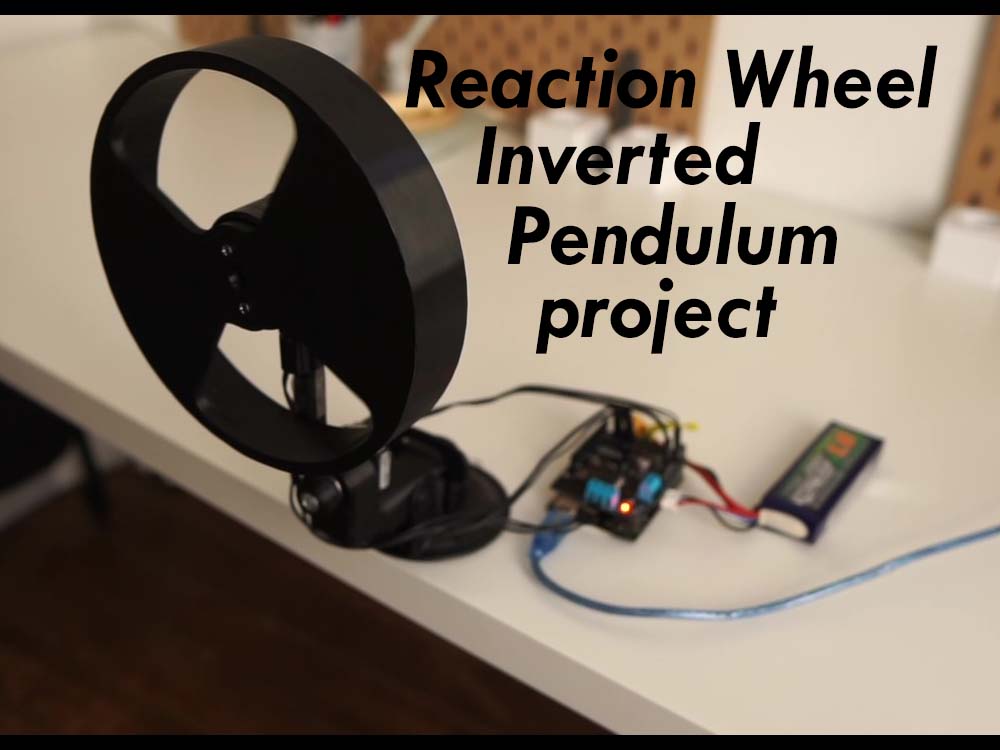
Project examples
Here is one project example which uses torque control and describes the full hardware + software setup needed.