On this page
Toolchain and flashing
SimpleFOC-microspora is built around the STM32G431CBU6 and is programmed over USB-C using the STM32 built-in DFU bootloader, so no external programmer is needed. You can use either PlatformIO (recommended) or the Arduino IDE.
Required libraries
| Library | Used for |
|---|---|
| SimpleFOClibrary | Motor control |
| SimpleFOCDrivers | DRV8316 driver, MT6701 sensor, CAN commander |
| SimpleCANio | CAN bus (only if you use CAN) |
PlatformIO (recommended)
The easiest way to start is to clone the Microspora firmware repository and open it in VS Code with the PlatformIO extension. If you are starting a new project, use this platformio.ini:
[env:SIMPLEFOC_MICROSPORA]
platform = ststm32
board = genericSTM32G431CB
framework = arduino
lib_archive = false
monitor_speed = 250000
upload_protocol = dfu
monitor_dtr = 1
lib_deps =
    Simple FOC
    https://github.com/simplefoc/Arduino-FOC-drivers.git#dev
    SimpleCANio

build_flags =
    -D PIO_FRAMEWORK_ARDUINO_ENABLE_CDC  ; USB serial
    -D USBCON
    -D HAL_FDCAN_MODULE_ENABLED          ; CAN (required, lib_archive = false builds the CAN code too)
    -D LED_BUILTIN=PC6
The reference firmware also defines all the board pins as build flags (PHA_H, ENC_CS, VSENS, …), see the full list in the pinout reference. The code examples in these docs use the pin names directly, so they work with or without those flags.
Arduino IDE
- Install the STM32duino core via the Boards Manager.
- Install the libraries listed above via the Library Manager.
- In the Tools menu select:
- Board: Generic STM32G4 series
- Board part number: Generic G431CBUx
- USB support: CDC (generic ‘Serial’ supersede U(S)ART)
- Upload method: STM32CubeProgrammer (DFU)
STM32CubeProgrammer is required
The Arduino IDE uploads using ST’s STM32CubeProgrammer, which is not installed with the STM32duino core. Install it and add its
binfolder to yourPATH, otherwise the upload fails withSTM32CubeProgrammer not found.Alternatively, use Sketch > Export Compiled Binary and flash the
.binfile with dfu-util while the board is in DFU mode:dfu-util -a 0 -s 0x08000000:leave -D your_sketch.bin
CAN in the Arduino IDE
The FDCAN HAL module is not enabled by default in the Arduino IDE. To use CAN, add a
hal_conf_extra.hfile next to your sketch containing#define HAL_FDCAN_MODULE_ENABLED.
Flashing in DFU mode
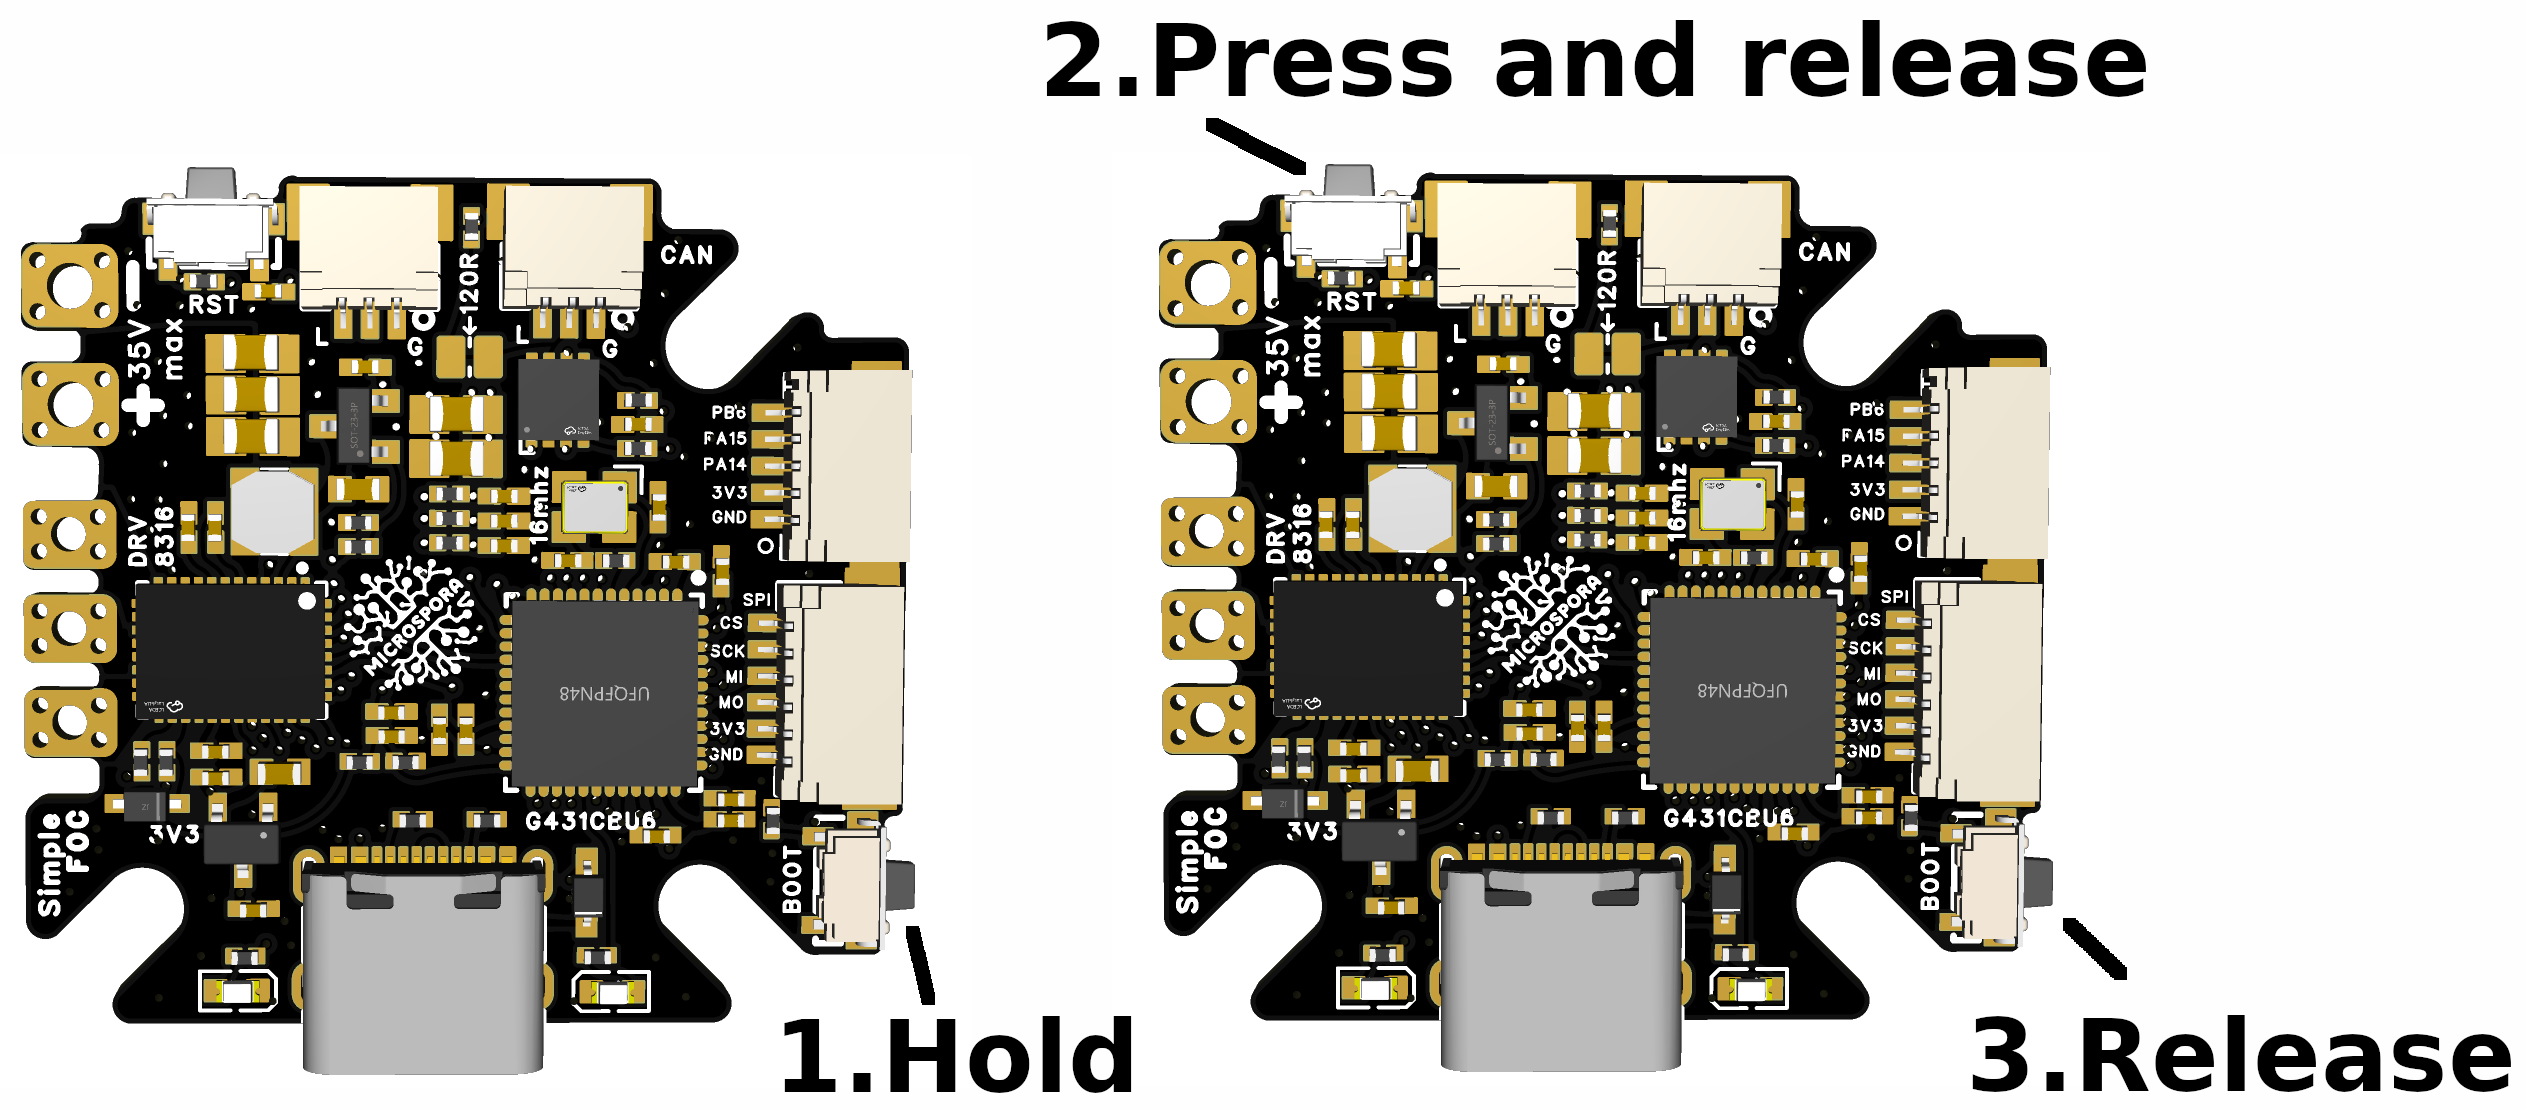
- Connect the board to the computer using USB-C.
- Enter DFU mode: hold BOOT, press and release RESET, wait one or two seconds, then release BOOT.
- Upload the firmware from PlatformIO or the Arduino IDE.
- Press RESET to start the new firmware.
Linux users
If the board is in DFU mode but the upload fails with
Target device not foundor a permission error, your user can’t access the USB device. Check that the board is visible withlsusb(it shows up as0483:df11 STMicroelectronics STM Device in DFU Mode), then add a udev rule:echo 'SUBSYSTEM=="usb", ATTRS{idVendor}=="0483", ATTRS{idProduct}=="df11", MODE="0666", GROUP="plugdev", TAG+="uaccess"' | sudo tee /etc/udev/rules.d/50-stm32-dfu.rules sudo udevadm control --reload-rules && sudo udevadm triggerUnplug the board, plug it back in, put it in DFU mode again and retry the upload.
Serial monitor
The reference firmware uses 250000 baud. Since the board uses native USB, the serial port disappears while the board is resetting. Add a short delay at the start of setup() so you don’t miss the first messages:
Serial.begin(250000);
_delay(3000); // give the USB serial time to connect